
A question that I get asked frequently is, “Can you please give me the password to this resource so I can delete the pages I don’t need?” Oftentimes, teachers ask this question because they either want to only share certain pages from the PDF with their students or send the PDF to someone in their building to print. In these cases, they want to delete the pages of a PDF they don’t want to share or print.
Why do I password protect my resources?
As a seller of digital resources, I must protect the integrity of my work and abide by the terms of use from clip artists. Not only is my work my own intellectual property, but any clip art I’ve purchased and used in a particular resource comes with strict guidelines for commercial use. I must use protection settings within Adobe to ensure that my PDF files remain encrypted and secure so they are not easily edited.
What if I need a password to print?
If you’re prompted for a password while trying to open or print a PDF, first, make sure any ZIP files that it’s contained in are completely extracted.
Sometimes you may be asked for a password when PDFs are opened in programs other than Adobe Acrobat or Adobe Reader. To resolve the problem, you can open the PDF with the latest Adobe Reader instead, which can be downloaded for free here:
http://www.adobe.com/products/reader.html
It’s important to note that you should open Adobe Reader first and then select the resource you wish to view from within Adobe Reader. To do this, open Adobe Reader and click File > Open to select the resource from your computer. Just clicking on the PDF alone may still open the PDF in a default program on your computer.
I’ve opened in Adobe, but I still need a password to reorder and delete pages. What do I do now?
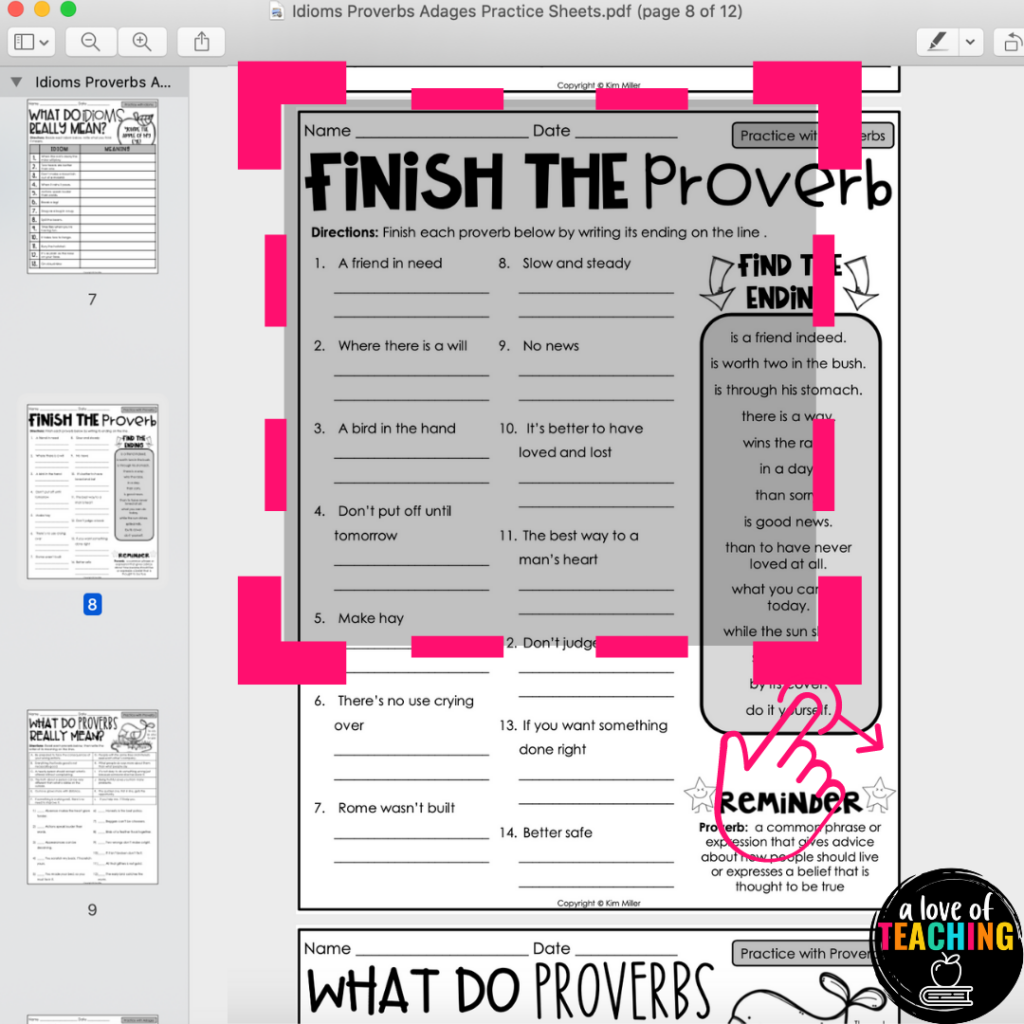
Adobe will automatically ask you for a password if you are trying to edit the PDF by reordering and deleting pages. A password-protected PDF is not designed to be edited. However, you don’t have to send the entire document to your students. It’s still easy to share only a few pages at a time. While PDFs can be a great resource, they aren’t interactive and can be hard to share on a digital platform. I’m excited to show you how to reorder, delete, and assign pages of a PDF before printing or sharing with your students.
Option 1: Rearrange and Delete Pages of a PDF Online
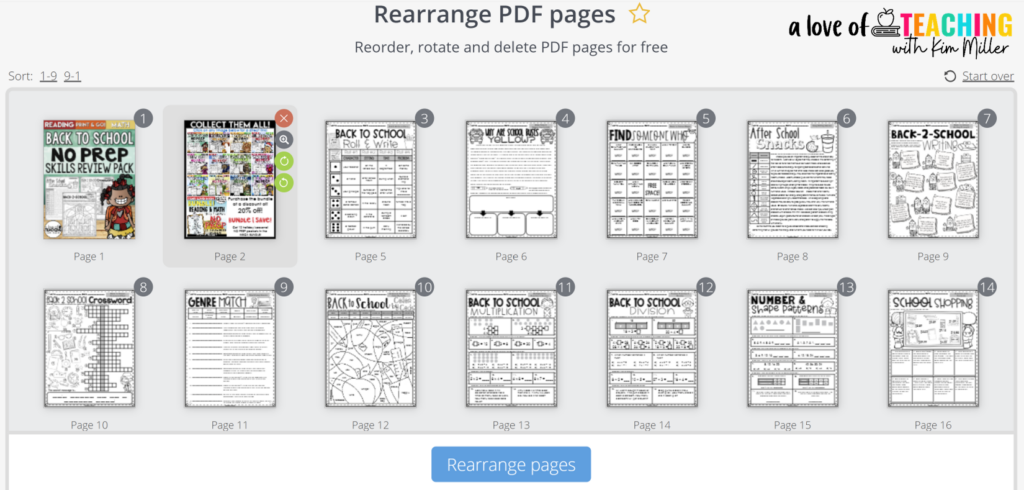
One of the best FREE websites for reordering, rotating, and deleting pages of a PDF is PDF Candy.
It’s a straightforward website to use. You can easily reorder PDF pages by dragging a page’s thumbnail and dropping it to a new place to rearrange pages manually.
Not only can you reorder PDF pages with this tool, but you can also rotate and delete some of the pages. Hover the mouse cursor over a page’s thumbnail to see the available options. Click the “X” icon to delete a page and use the magnifying glass icon to get a closer look at it. Click the green buttons to rotate a page clockwise and counterclockwise.
To use PDF Candy:
- Click here >>> PDF Candy
- Click the “Add file” button to upload a PDF document. All the pages of the document will be shown as thumbnails after the PDF is uploaded.
- Drag and drop them to change the page order in a PDF.
- Delete and rotate certain pages if needed.
- Click the blue “Rearrange pages” button to create a new file.
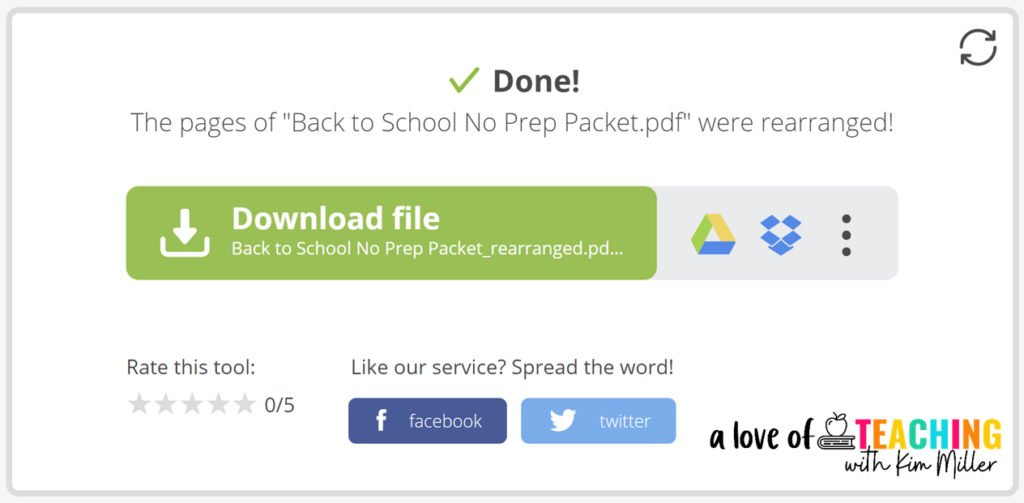
- Download the PDF to your computer or upload it to your Google Drive or Dropbox.
Now, you have a new PDF with only the pages you needed to share. Easy peasy!
Another great online tool for sorting or deleting pages inside a PDF document is PDF2GO. Just upload your file, and after the thumbnails have been generated from your PDF file, you can sort the pages. Sorting & deleting a PDF has never been so easy!
Option 2: Use Screenshots
The hands-down easiest and fastest way to assign all or part of a PDF to your students has to be the screenshot method. In about 30 seconds, you can screenshot a few PDF pages and import them into a digital platform. You could even email your screenshots directly to your students. While this option isn’t editable, it does give you the ability to use the PDF pages as part of your digital lesson plan without asking students to download a big PDF file onto their electronic devices.
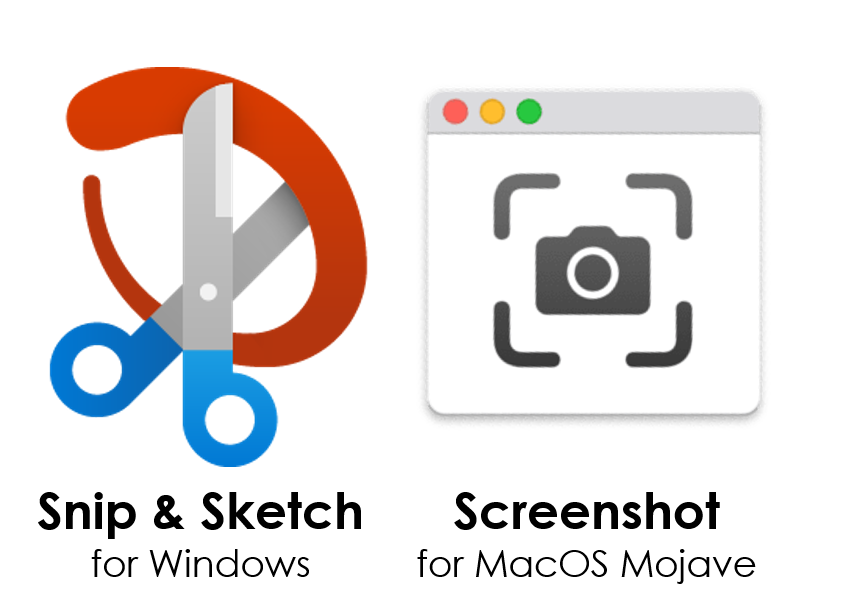
You can quickly take a screenshot on a PC using the Snip & Sketch Tool or press the Windows Key and Print Screen button simultaneously. On a Mac, you can use the Screenshot App, press Command+Shift+3, or select a particular area using Command+Shift+4. If you have upgraded your Mac to Mojave, press Command+Shift+5.
To use screenshots:
- Open the PDF in a PDF viewer such as Adobe Reader.
- Use your screenshot tool to take a picture of each page inside the PDF you want to use.
- Save the screenshot to your computer as an image.
- Add the pages to your digital assignment or attach them to an email to share with your students.
Because you are taking a screenshot of individual pages of the PDF you are using, it’s easy to reorder, delete, or assign one page to your students through your favorite digital platform.
To create a new PDF using your screenshots, open Google Slides. Drag and drop the screenshots or import the images. Then, save the Google Slides as a new PDF.
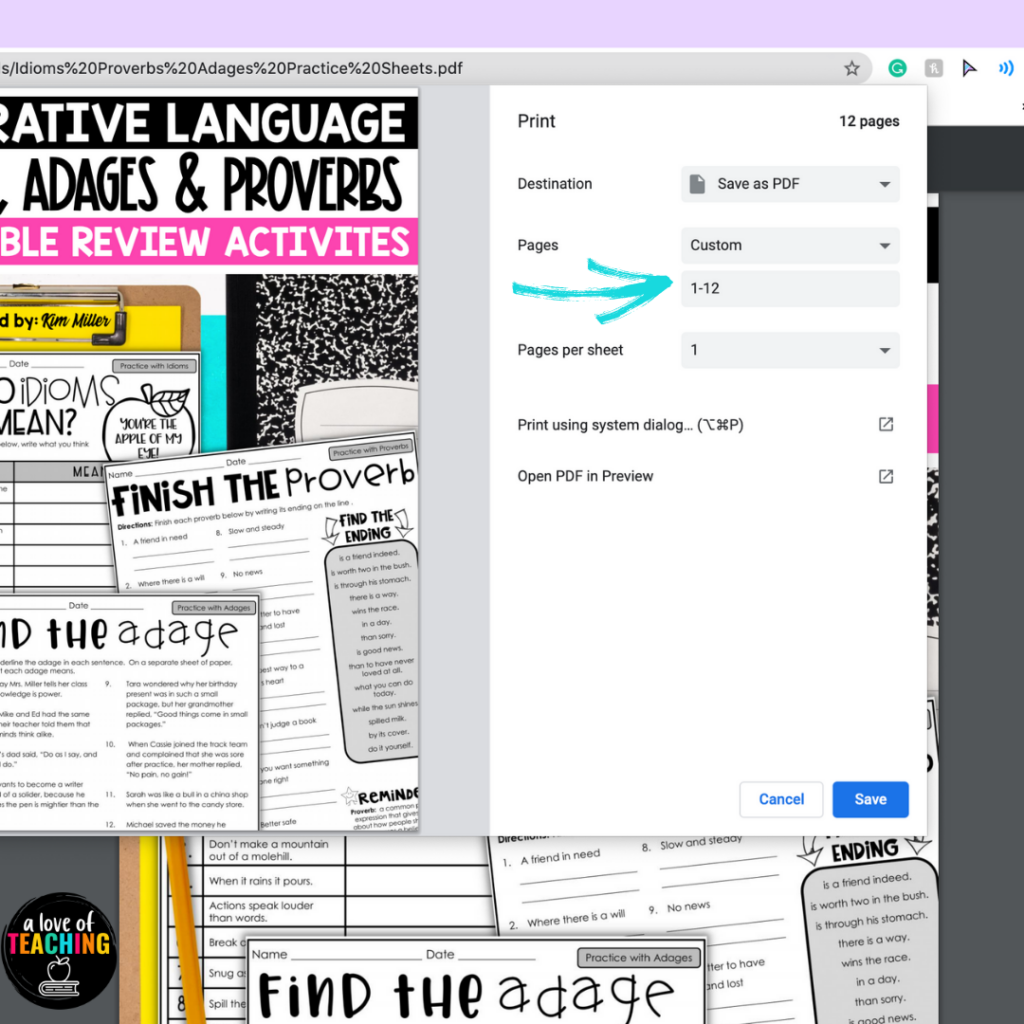
Option 3: Create a New PDF Using Google Chrome
I know what you’re thinking, “But Google Chrome isn’t a PDF reader!” and you would be right. However, Google Chrome has so many other features that you may not have had the opportunity to explore yet. Using Google Chrome, you can pull out specific pages from a PDF to share with your students via your favorite digital platform.
To use Google Chrome:
- Open a new Google Chrome window or tab.
- Click Ctrl + O (Command + O on a Mac) to select and open your PDF file. Your pdf will open in the Chrome window.
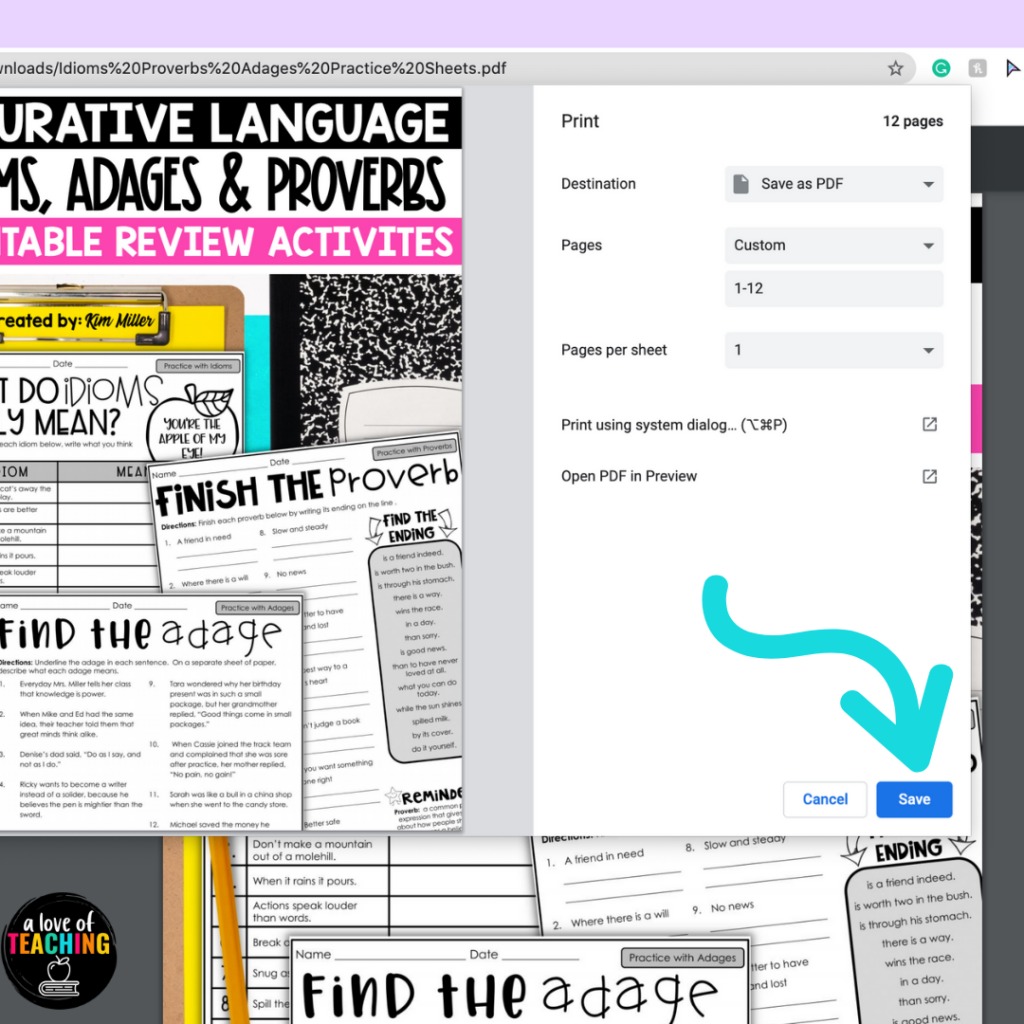
- Click on the Print icon at the top right of the screen. On a Mac, click on File and Print in the Chrome Navigation bar. This will open the print settings box.
- Next, click the dropdown arrow next to the word PAGES and select Custom. Then type in the page number or numbers you’d like to pull out. Don’t worry you aren’t actually going to print them.
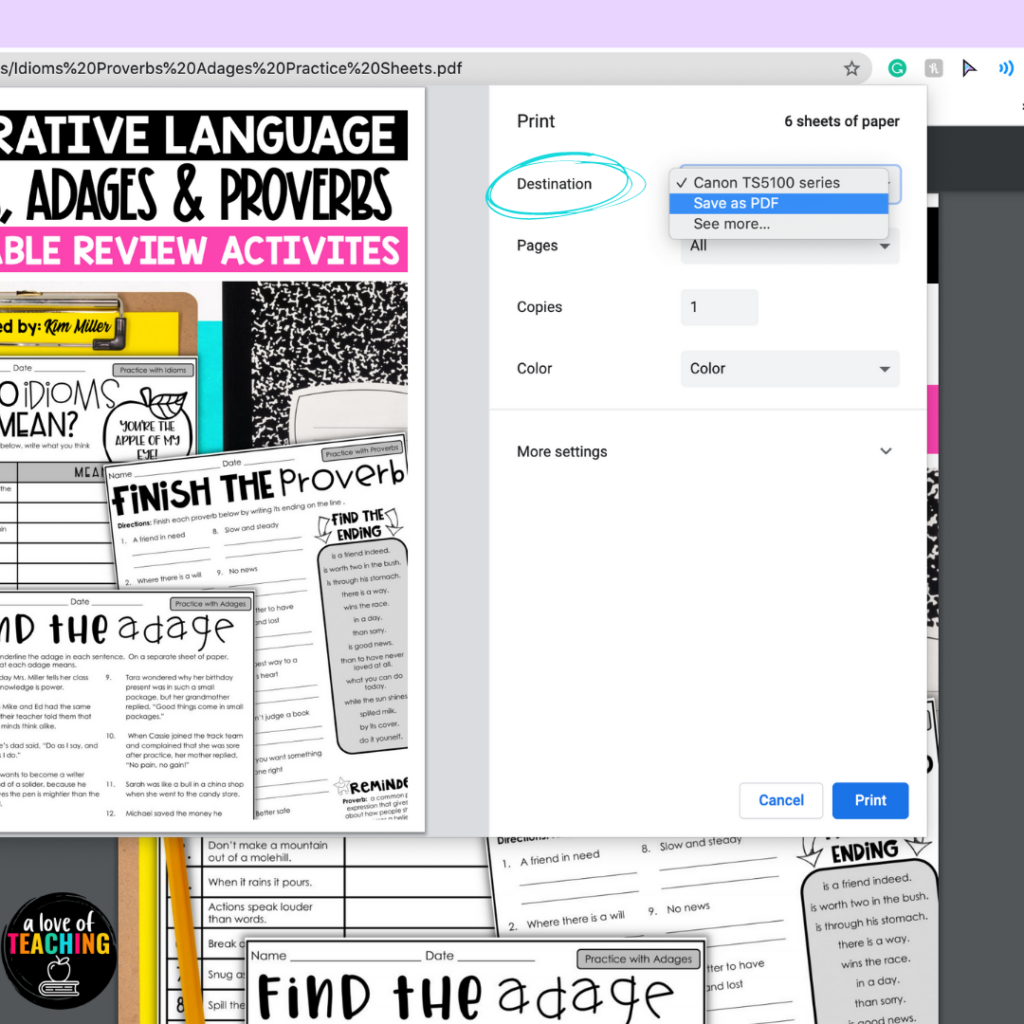
- Use the dropdown arrow next to the word DESTINATION and make sure to select Save as PDF.
- Once you have added the page numbers and selected Save as PDF, click Save in the bottom right corner.
- You will be prompted to choose a location on your computer to save to. You can also change the name of the file if you wish. Then click Save one more time to save the file to your computer.
You will find the new file on your computer in the location you selected.
This is a pretty simple process. Even though it looks like many steps, you can get the pages from your PDF in about one minute. Then, you can pull out your selected page(s) and have them ready to share with your students.
Now You Can Reorder, Delete, And Assign Pages of a PDF Like a Technology Pro!
All of these options are perfect for reordering, deleting, or assigning specific pages of a PDF. Using one of these three options, you can easily remove the pages you don’t want to share with your students. Also, having the ability to use your tried and true PDFs in your digital lesson plans will save you so much time with lesson planning and allow you to continue using those new digital skills you have acquired recently.
Looking for more great tips for digital and virtual teaching?
- 5 Ways to Use PDFs Digitally in the Virtual Classroom
- How to Use TpT Digital Activities for Distance Learning
- 15 Must Haves for Virtual Teaching
Save these tips for later!
Be sure to pin this page to your favorite Pinterest teacher page so you can come back any time to try some of these easy ways to use PDFs in your digital lesson plans.


This Post Has 2 Comments
Hi Kim!
I am really not sure what I am doing wrong. I just can’t save it. This is the first time I have been unable to save a file and print individual pages from it. I actually always use method 3 you suggested as saving and then exporting. I don’t know what else to try and I don’t know how I can use this with my students as individual lessons. It actually shows at the very top of my screen that it is a PDF but it says Powerpoint right beside it too. I am not sure if the file is corrupt or what the next step is, but I can;t really use this as is. I welcome any other suggestions. Thanks for all your support!
Patty
Hi Patty! I found your email on my website. Haha! I emailed you back. Let me know if it doesn’t work! 🙂