
Welcome back! If you haven’t read Part 1 of my 16 Time-Saving PowerPoint Secrets for Creating Printables make sure you don’t miss it. The first 8 great PowerPoint tips are there.
If you’re back for more of my PPT secrets, then get your pen and paper ready, because I have a lot to share with you! I also have a bonus PowerPoint secret at the end so be sure to read all the way through (even if you already know all these secrets). 🙂
PowerPoint Secrets and Tips 9-16
Formatting the Background
My first time-saving secret is all about formatting your background. When creating printables or (if you’re a TpT seller) product covers you sometimes want a background image. We often refer to these images as digital background paper.
There are two ways to add a background image in PowerPoint.
Option 1
You could simply click on the Insert tab > Pictures > Choose your image > and click Insert. This would place the image on the page and you could drag the corners and sides to fill the background space. However, two things are going to take place when you do this.
- You’re going to distort the image.
- The image is going to be easily moved around on the page.
The goal here is to fill the background with the image. You don’t want the image to look distorted and you’re going to get frustrated if you’re constantly moving it around while adding other objects to the page.

Option 2
You could format the background to add digital papers to your PowerPoint slides. This is the best way to add a background to your printables because…
- Your image will automatically fill the space and not be distorted due to stretching.
- The image will not move around on the page.
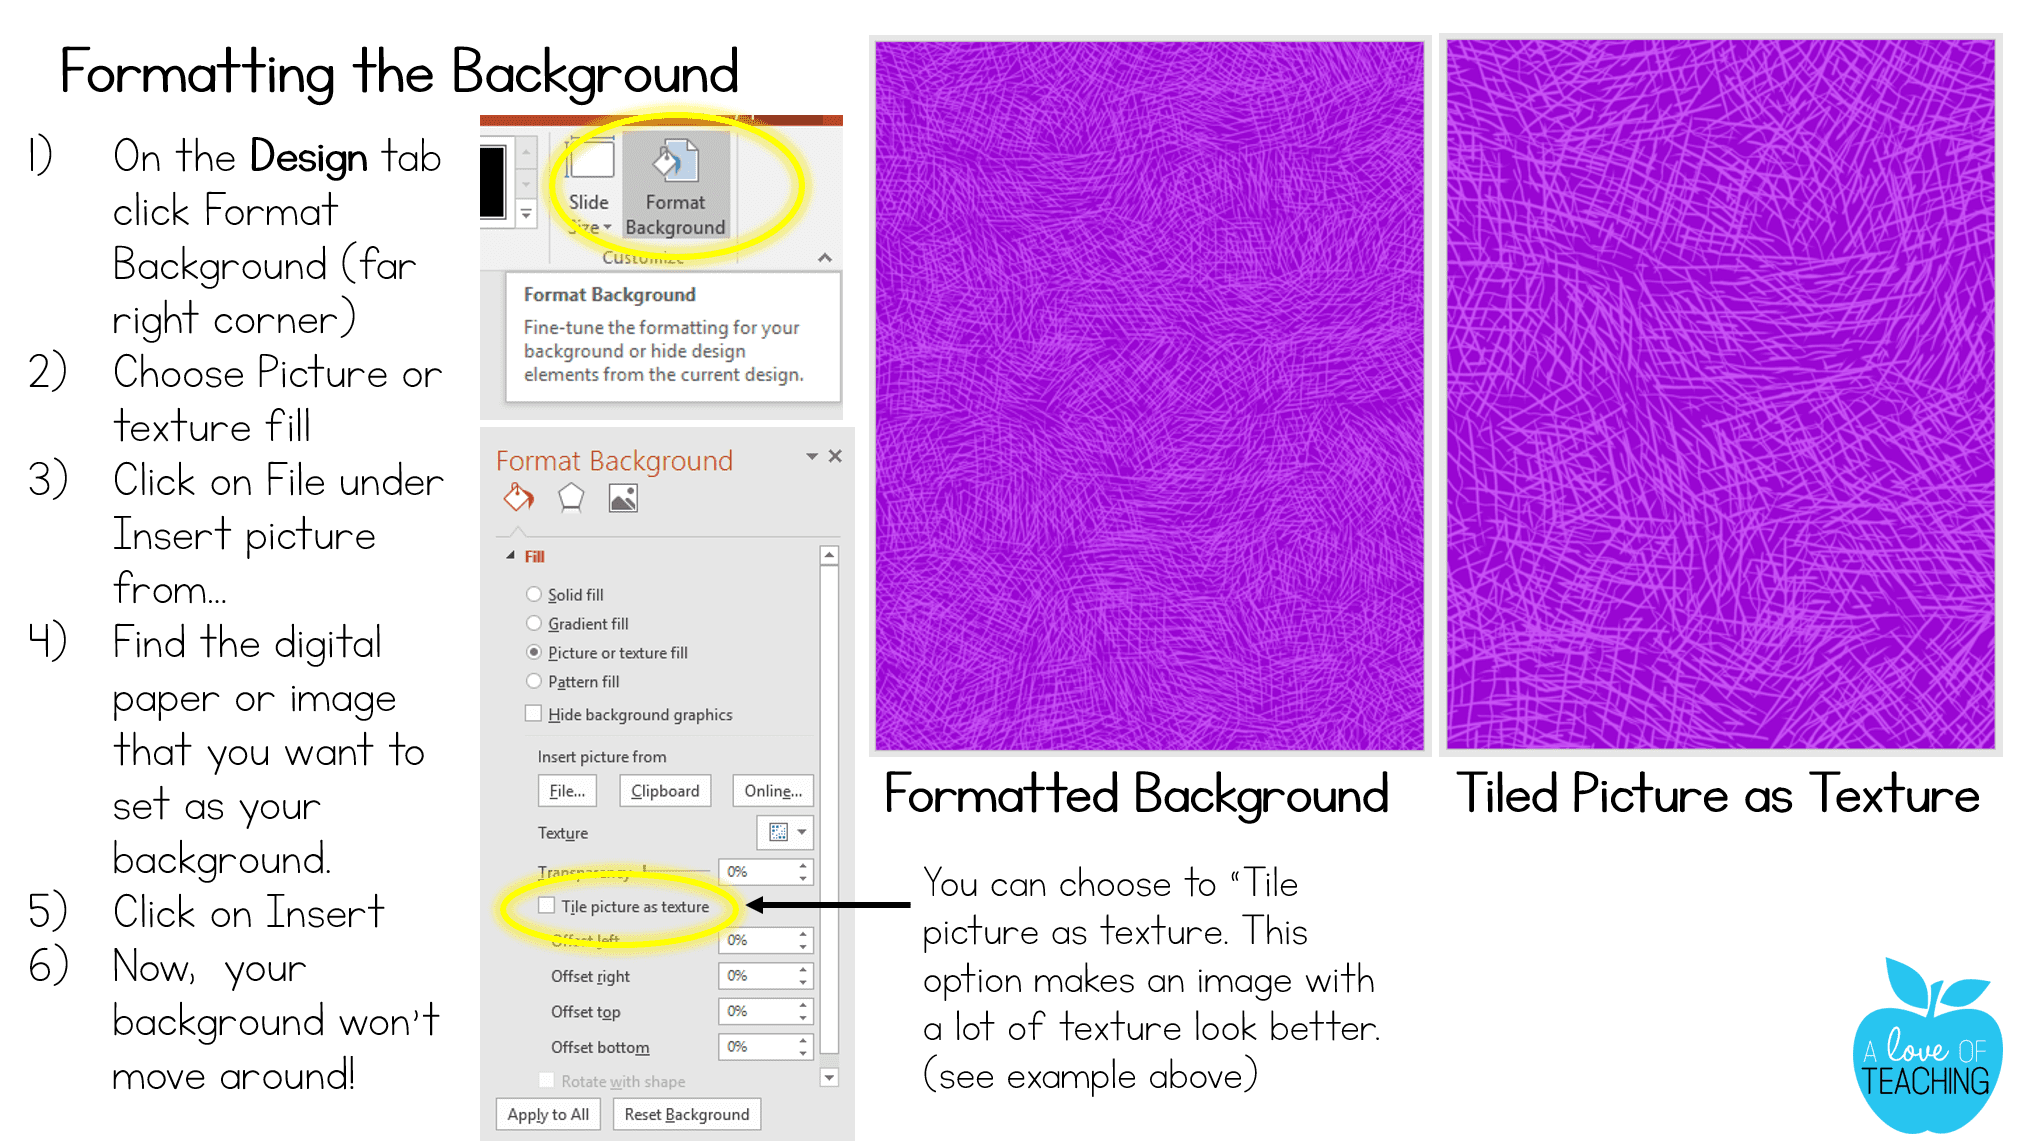
The example above shows you how to format your background by clicking on the Design tab > Format Background > Picture or texture fill > File > Search for image > Click Insert.
You can also choose to check the box “Tile picture as texture”. I always check this box just to see if the image would look better tiled, but I mostly use it for textured backgrounds similar to what I used in the example above.
Formatting your background will make your digital paper look much better! Your images will not be distorted and you won’t get frustrated when you accidentally move the background around on the page.
Pin for later so you can come back quickly!
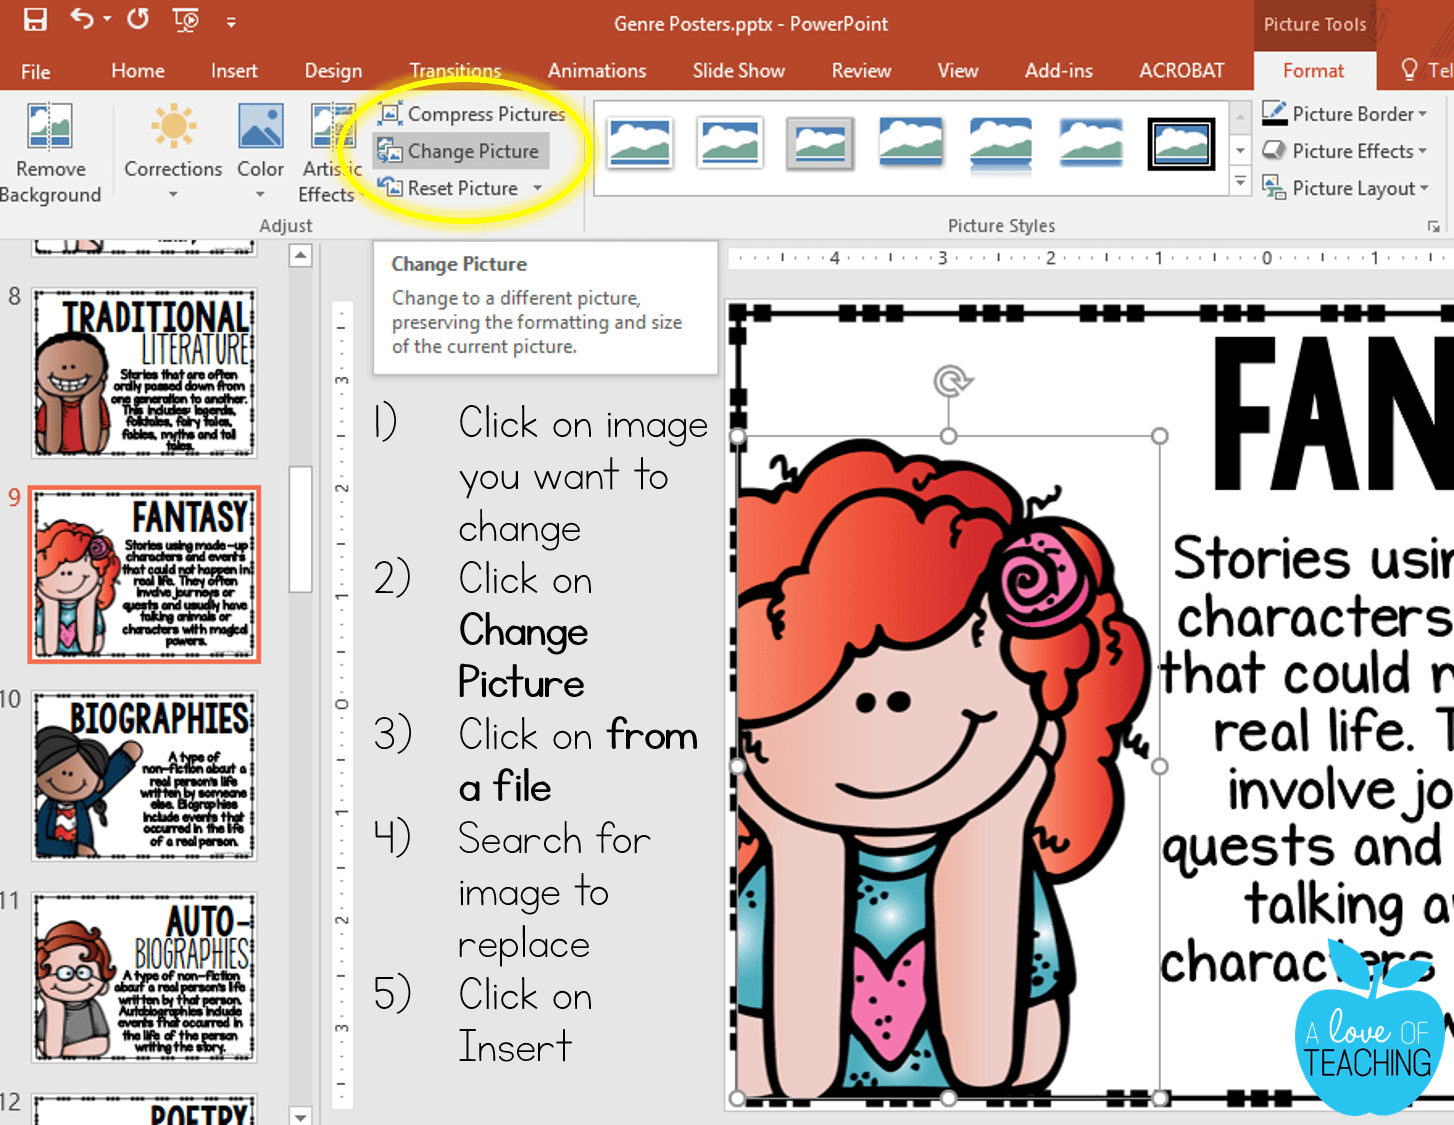
Using the Change Picture Tool
The Change Picture tool is often useful when you are trying to find the “perfect” image or piece of clip art to use on your page. I find myself using this option a lot – especially when I want to try out different images to see which one looks or fits the best. You can always delete the image and insert a different one, but the formatting is not saved when you do that.
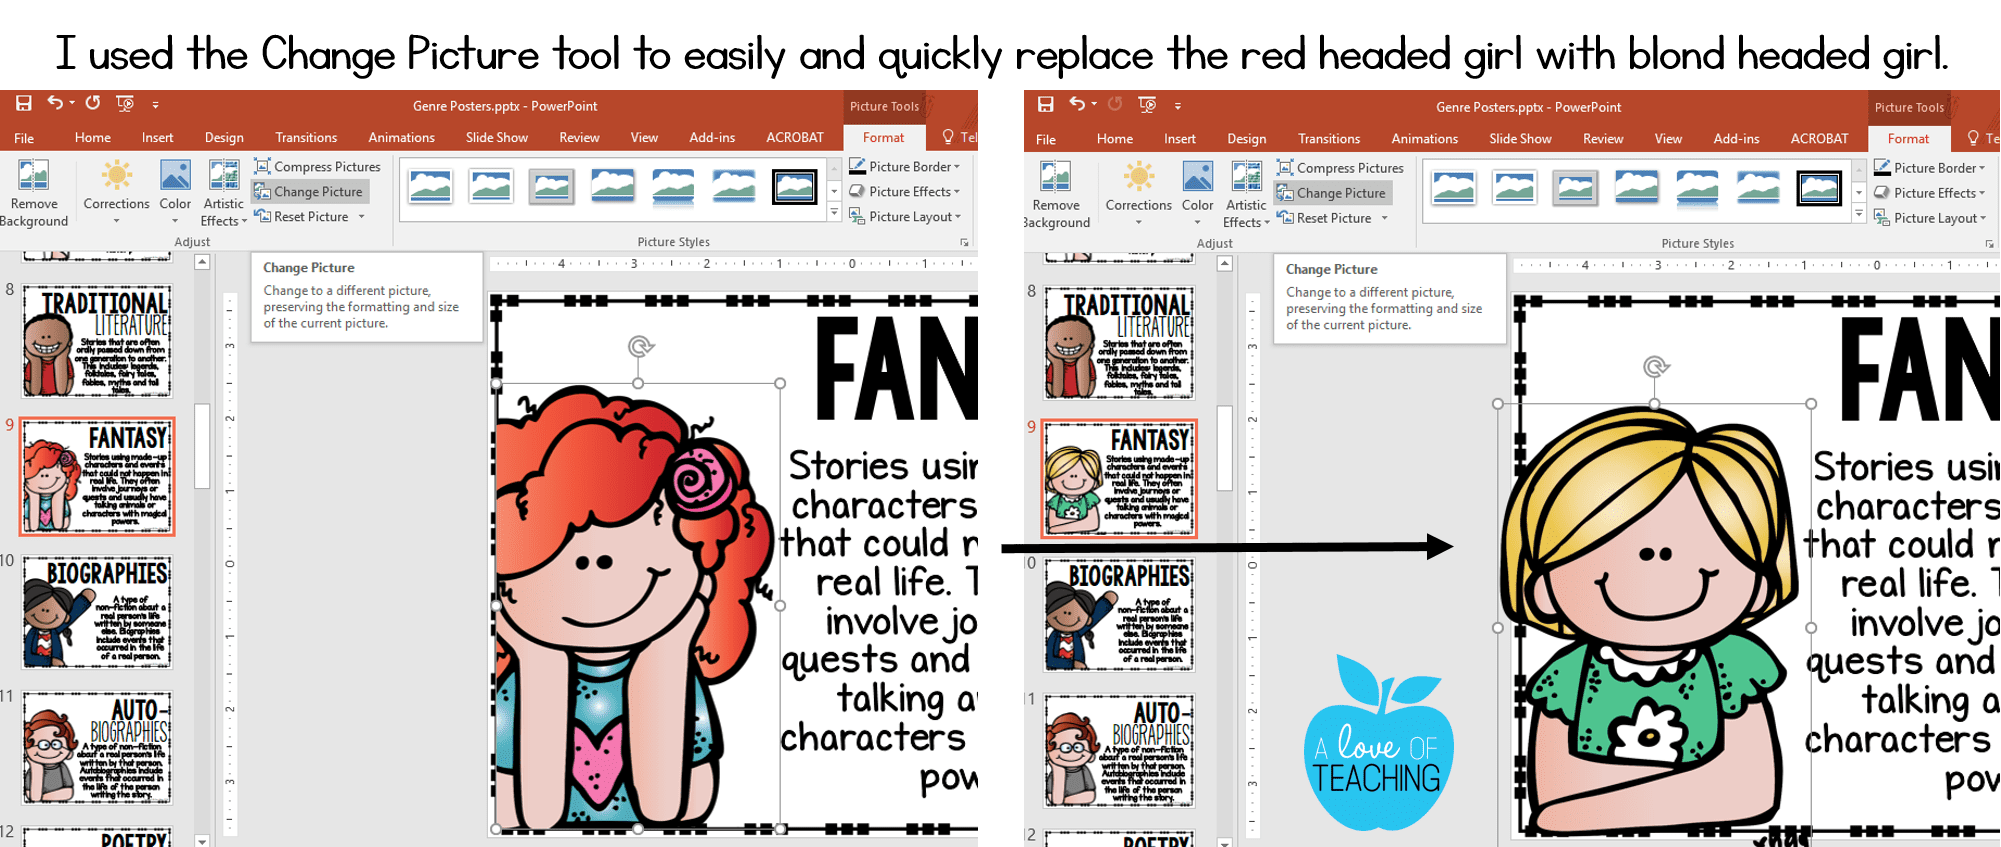
However, if I’ve resized the image or clip art to fit a particular space, the Change Picture tool will replace the image with another one while keeping the image size and formatting close to the same.
When you click on an image in PowerPoint, the Picture Tools in the Format Tab automatically open in your ribbon at the top of the screen.
Click on the image you want to change > Click on Change Picture > Choose From a file > Search for a different image to replace the one you already have on the page > Click on Insert.
Using the Selection Pane
This time-saving secret will come in handy when you are working with several pieces of clip art or text boxes on one page. Sometimes I like to use several different objects (clip art, page borders, text boxes, shapes, etc.) when I’m building printables. When you put all these different objects on one page you end up layering them. I’ll discuss how to layer objects in the next tip, but for now, we are going to focus on “naming” them.
When you use the selection pane you can easily select objects, change their order, or change their visibility. As you add objects to a page it’s a good idea to name them. This makes finding an object much easier when you want to move, replace, or delete it.
I’ve used my monthly newsletter templates in the example below. This page has a ton of images, text boxes, shapes, etc. They are also layered so that certain objects are in front of or behind other objects. As I placed these objects on the page, I gave each one a name in the selection pane on the right.
How To . . .
To access the selection pane select an image > click on (Picture Tools) Format Tab > Selection Pane
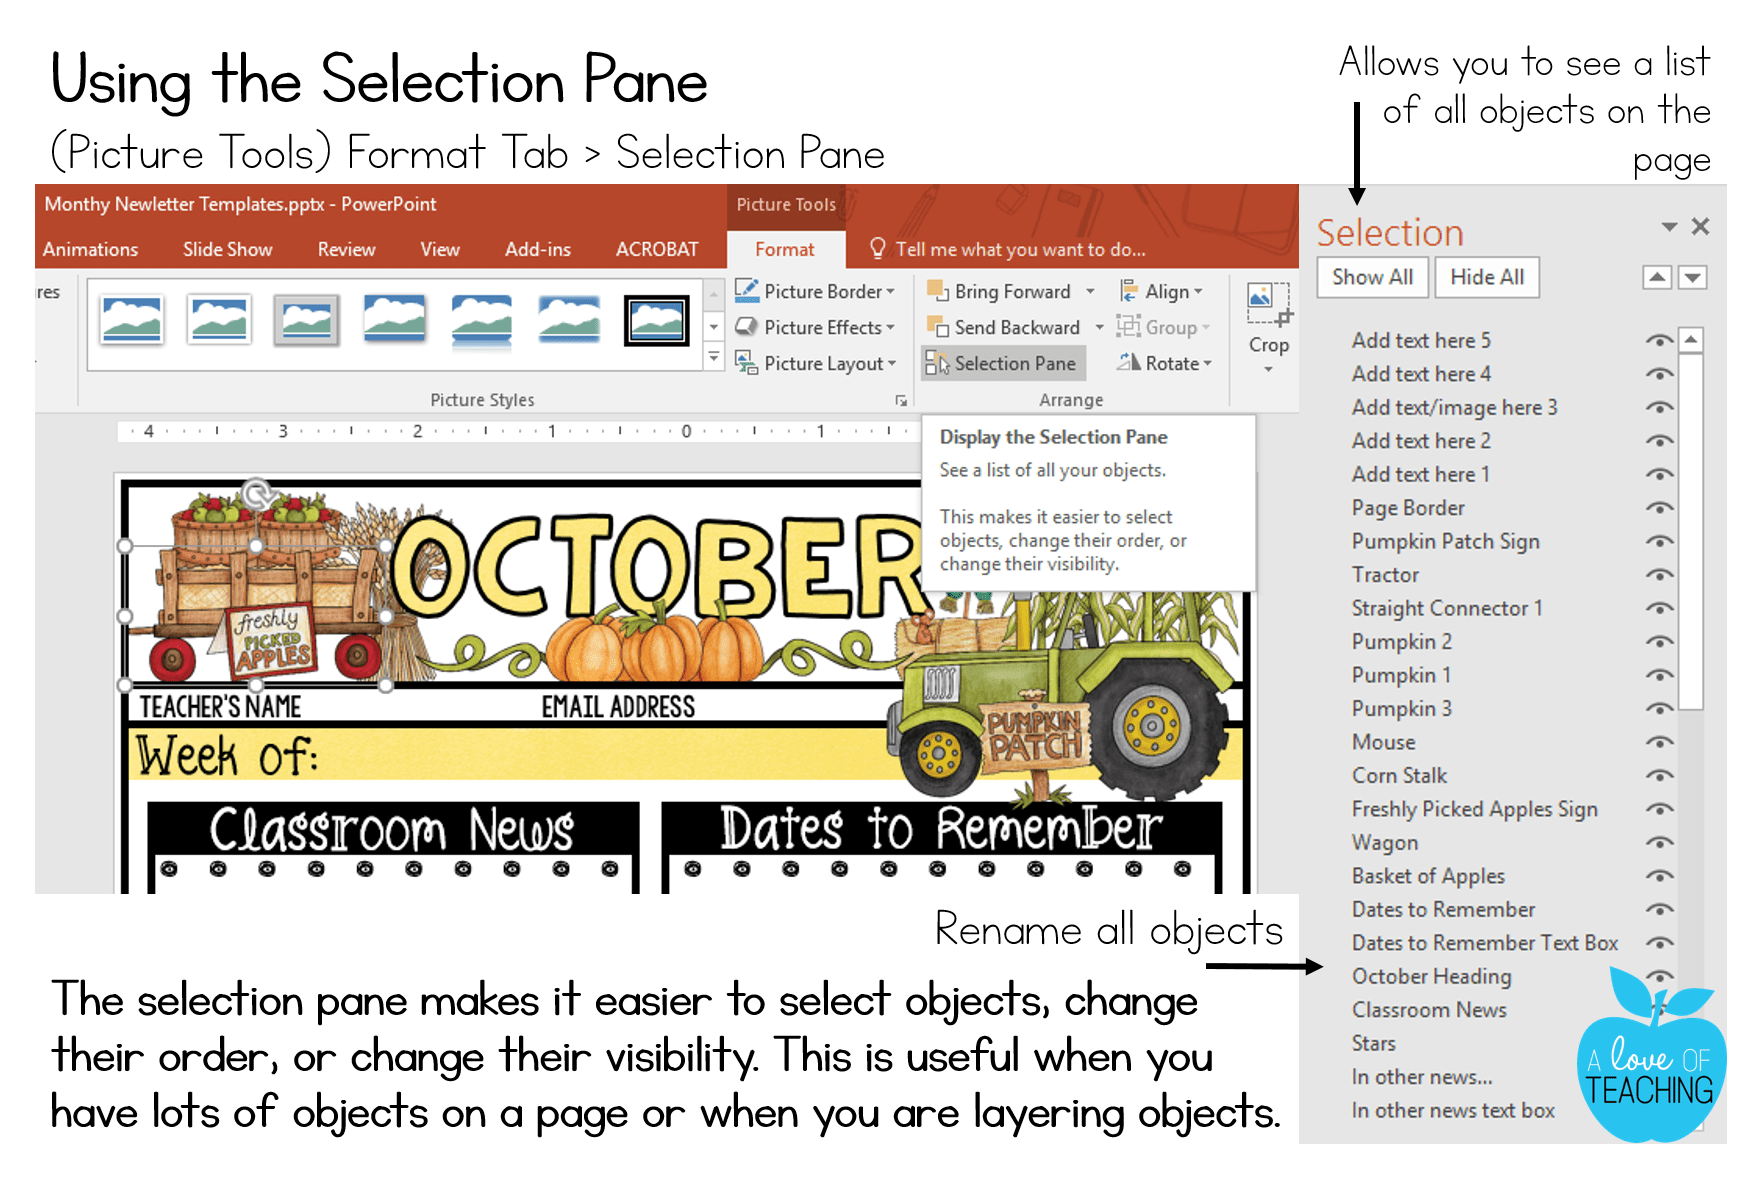
You can name an object simply double-click on the original name it was given when inserted. This will automatically show up in the selection pane. For example: when I inserted the tractor clip art PowerPoint named it “Picture 1”. I double-clicked on this wording in the selection pane and renamed it “Tractor”. I also inserted three pumpkins on the page. As I inserted them, I named them “Pumpkin 1”, “Pumpkin 2”, and “Pumpkin 3”.
Why it saves time . . .
Now, why did I do this? As you can see in the example above I have many different objects in my October newsletter. This requires lots of layering and alignment to get them in the right places. There is a hay bale behind the tractor and stalks of wheat behind the wagon and header.
If I wanted to move either of these objects I would have to move everything in front of it to get to them. Instead of messing up my design, I could simply click on the name of the object in the Selection Pane and from here I could reorder, move, delete, or replace the object. This keeps my original design in place and doesn’t move any other object on the page – definitely a huge time-saver!
Layering & Arranging Objects
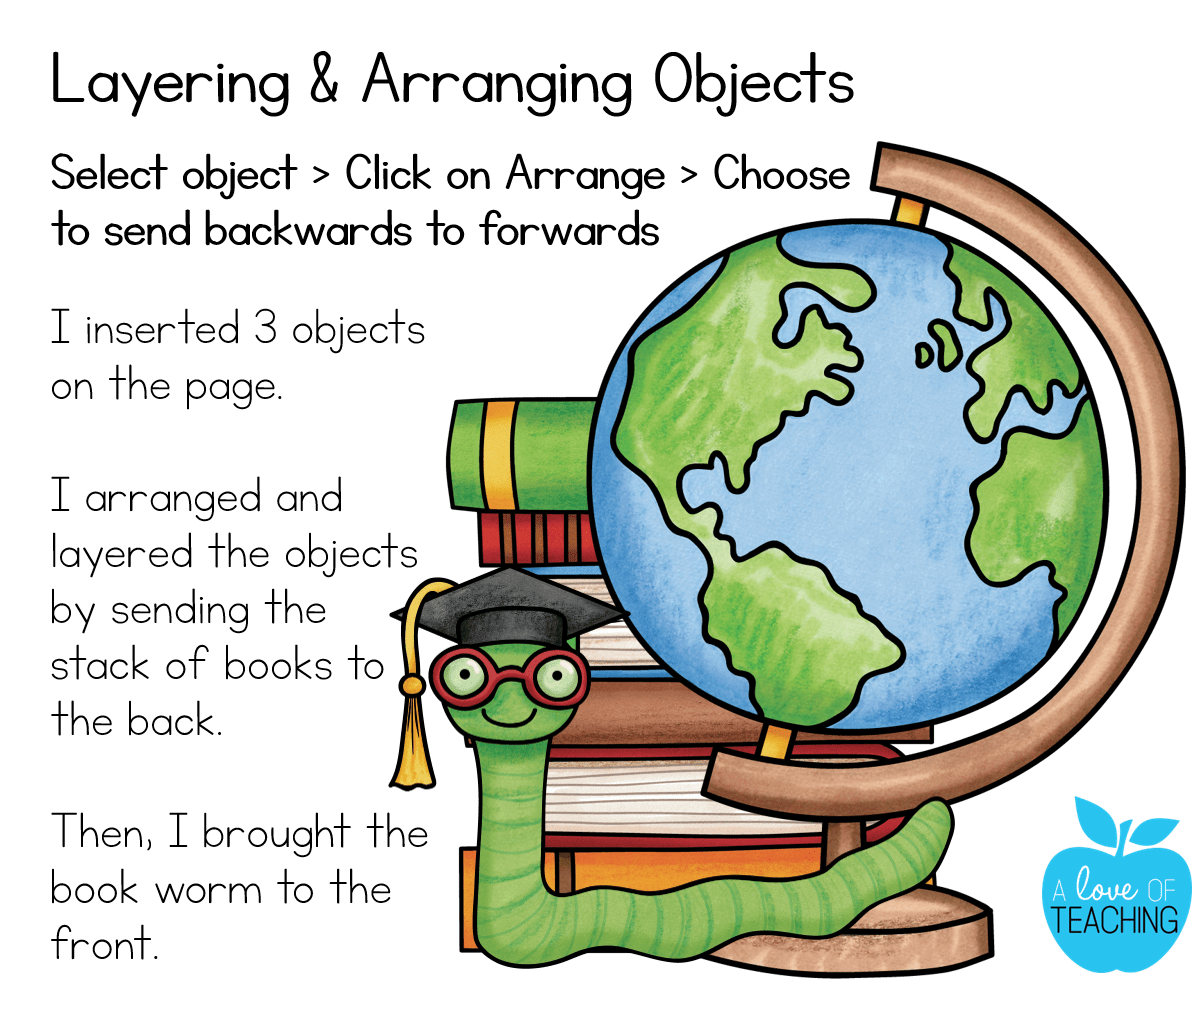
In the last time-saving secret, we talked about “naming” objects using the Selection Pane, and I briefly mentioned how helpful this tool is when “layering” objects. You can layer objects by bringing them to the front, sending them to the back, or you can slightly nudge an object forward or backward.
Let’s look at my October newsletter template again. There are a lot of graphics layered in my header. The bundle of wheat was originally behind the wagon, basket of apples, and the October title. Since it was behind other images, I could not click on the wheat image to move it. I could have moved the wagon and baskets of apples to get to it, but I had those images where I wanted them, and I didn’t want to spend time arranging them all again.
Since I had previously named each image as I inserted them on the page, so I could use the Selection Pane to select the wheat and bring it to the front. From here, I could move it around on the page and reorder the object without moving any of the other graphics.
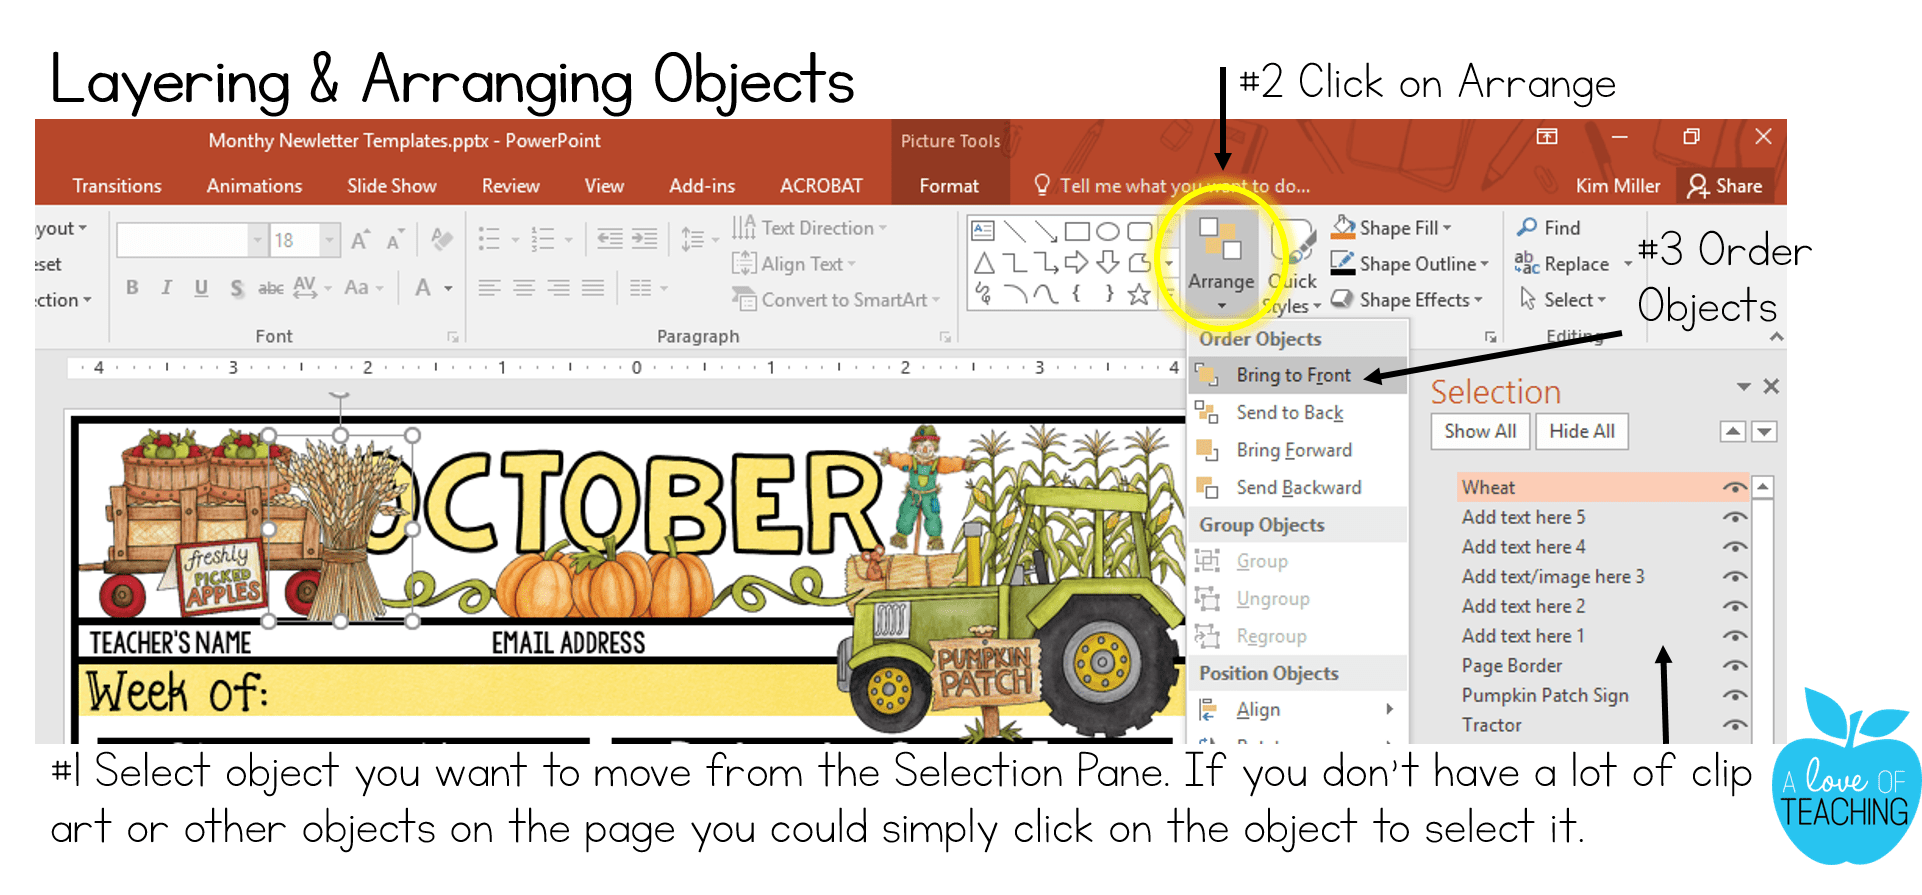
If you only have a few objects on the page you don’t necessarily have to use the Selection Pane. You could click on the object you want to move and arrange it either backward or forwards. (see example below)
The arrange feature comes in handy when you are working with many different objects or if you are trying to create a scene.
Grouping Objects
PowerPoint enables you to group objects on your slides which can be a big time-saver! This feature is particularly useful when it comes to creating complex pictures because it allows you to work on one part of the picture, group it, and then work on the next part of the picture without moving the objects you’ve grouped together. Pictures, shapes, clip art, and text boxes can all be grouped together.
Let’s take a look at my Speller’s Choice Menus. There are a lot of graphics and text boxes on one slide. I placed the cascading flowers where I wanted them, but I didn’t want to accidentally move one of them while I continued to work on the design of the page. To lock them in place, I selected all of the flowers > clicked on Arrange > clicked on Group. This grouped all the flowers into one object.
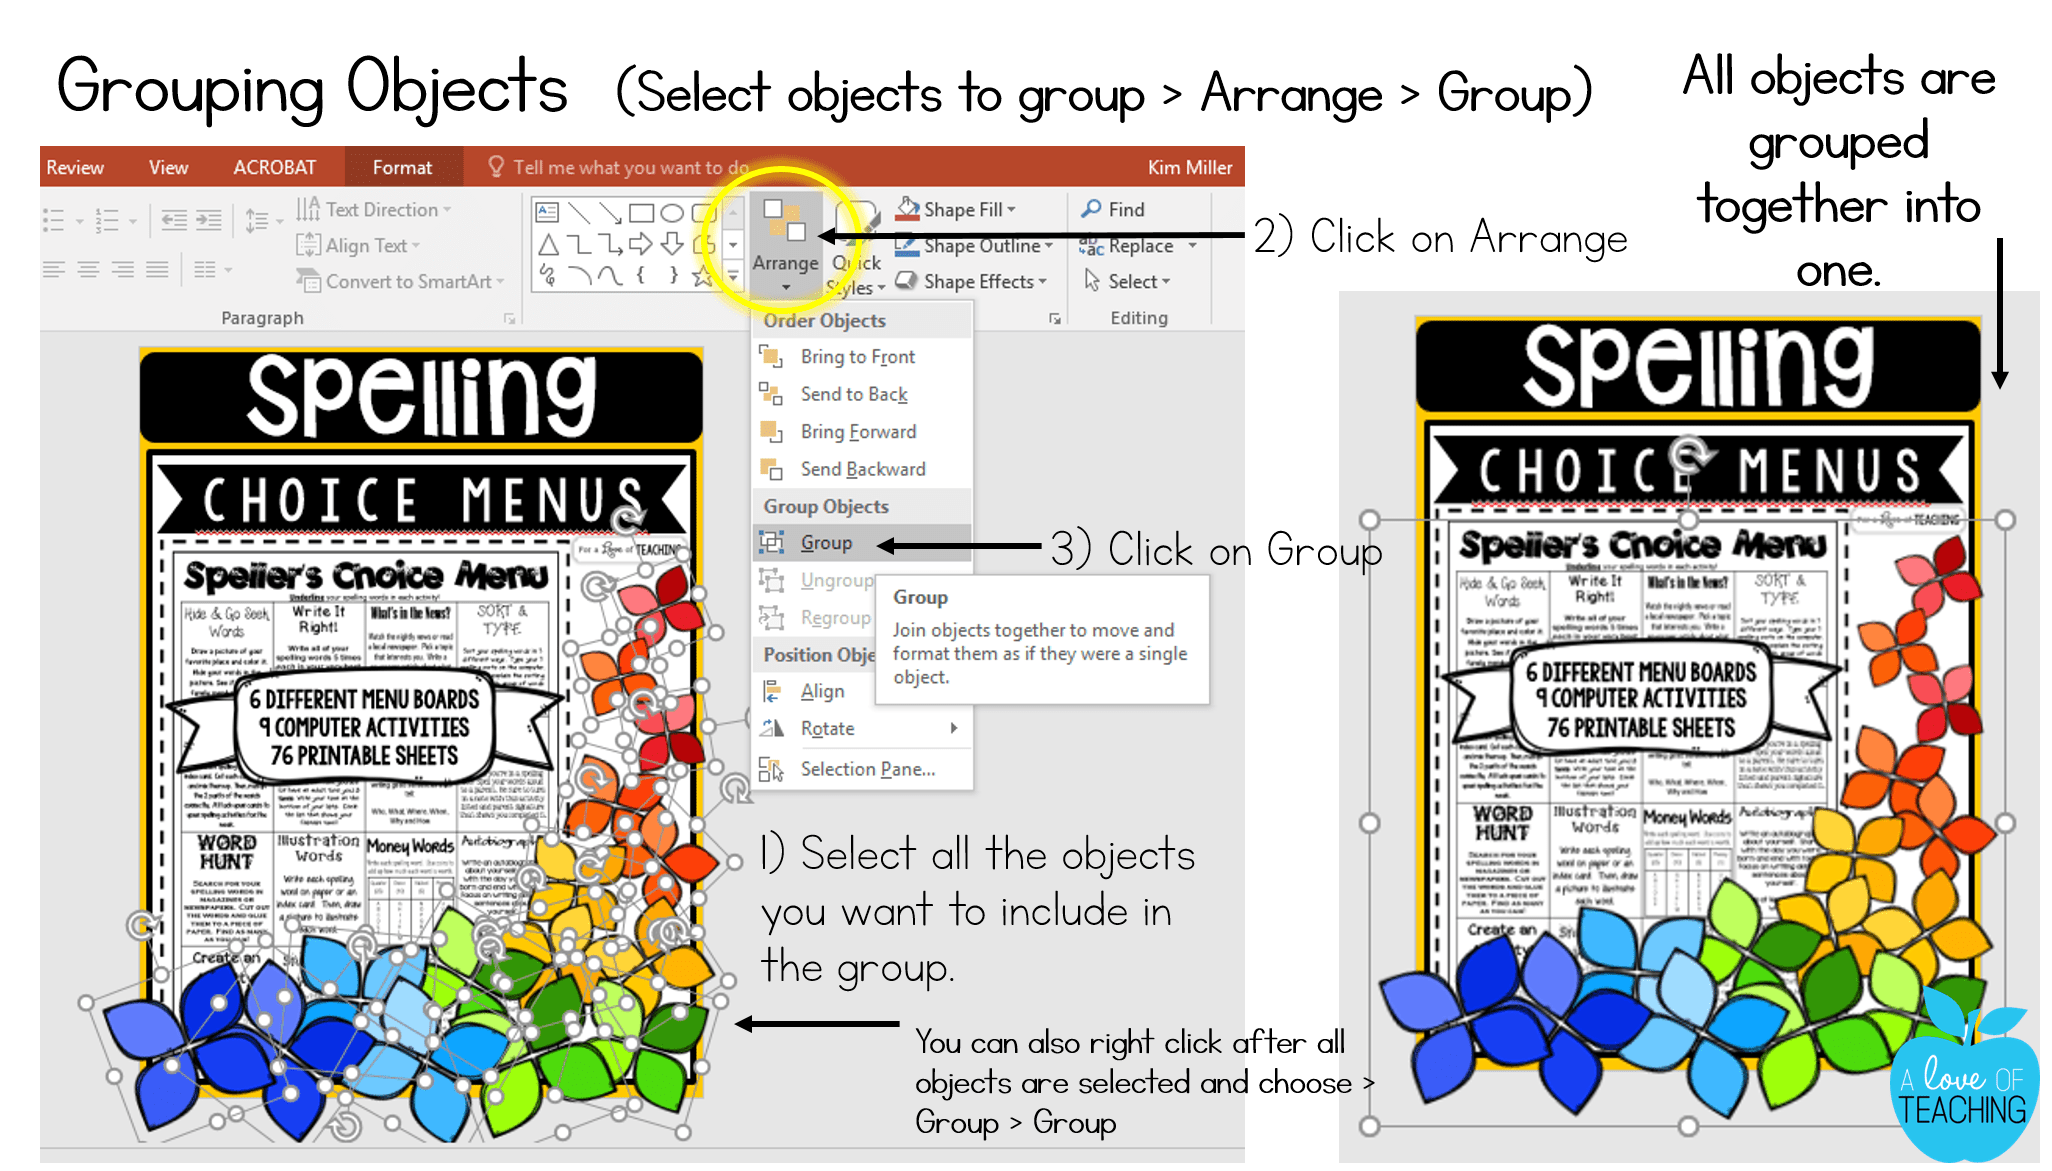
You can also select the objects to group together and right-click over them to choose Group > Group. Or, you may decide that you want to ungroup objects so that you can work on your design. You can also regroup it all back together again. This will save you time trying to fix it back if you accidentally move an object while working on another area of the slide.
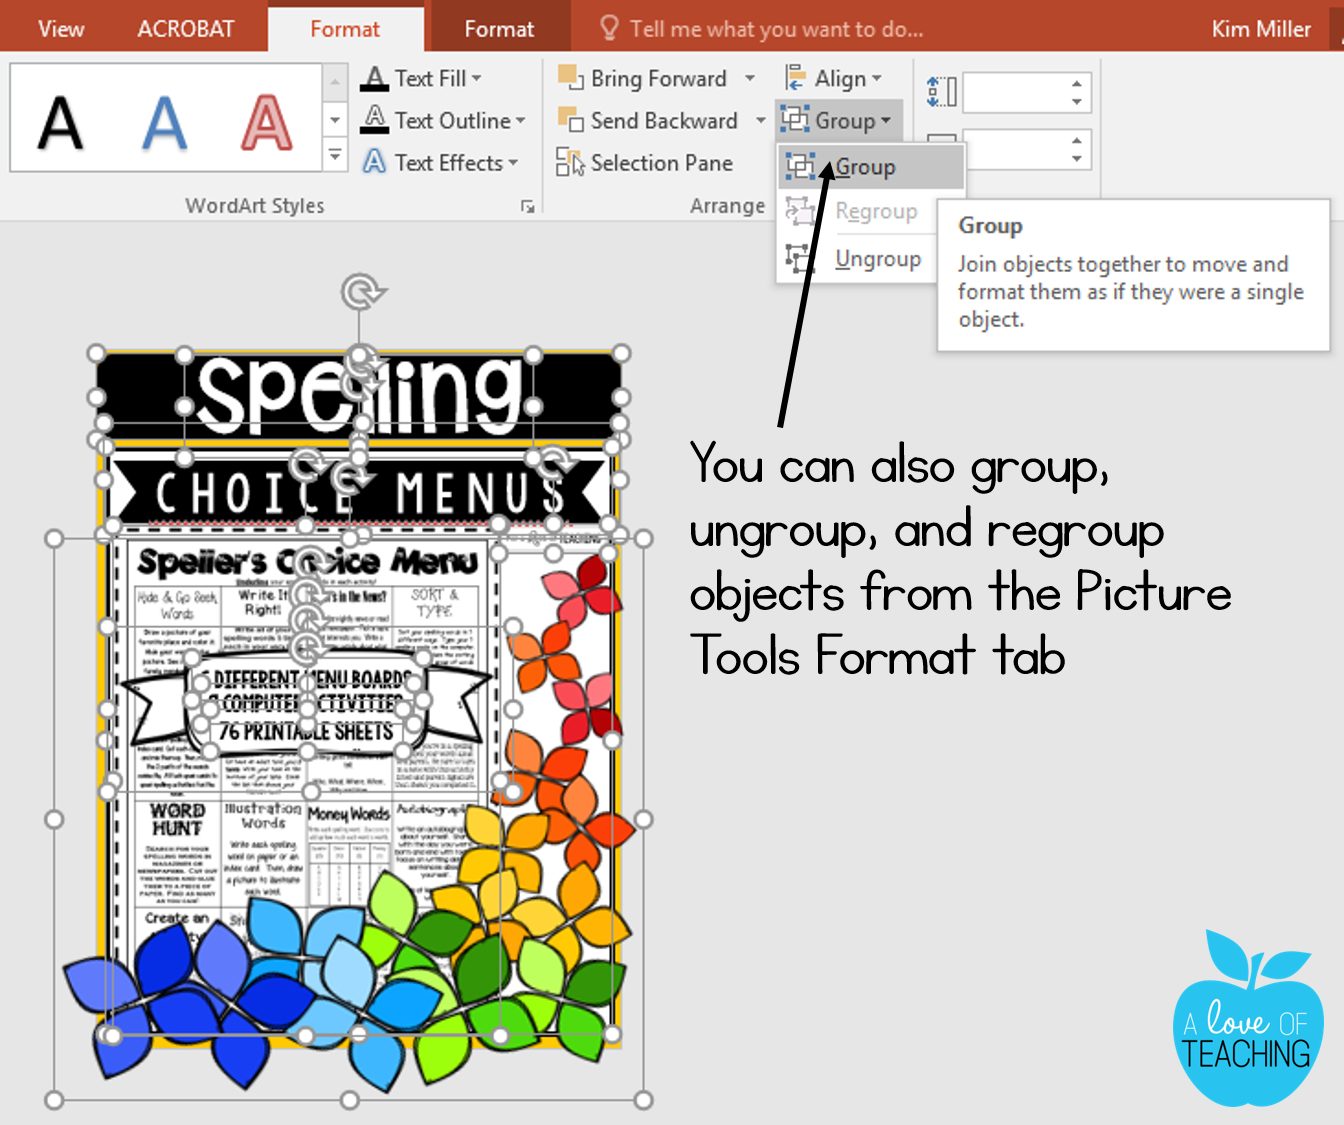
Objects grouped together in PowerPoint will also stay together if they are moved or resized. This is much quicker and easier than selecting all of the objects each time you want to move them (especially when you have objects layered over each other as I do in the example above).
Reusing Slides
This is one of my favorite time-saving secrets! I use it A LOT! Reusing slides is one of the quickest ways to insert a slide you’ve previously created into another document. You could always open up both documents and cut and paste from there, but there is an easier way!
One way I reuse slides is by adding my thank you and terms of use page to a product I’ve created. To do this go to the Home tab > New Slide > Reuse Slides
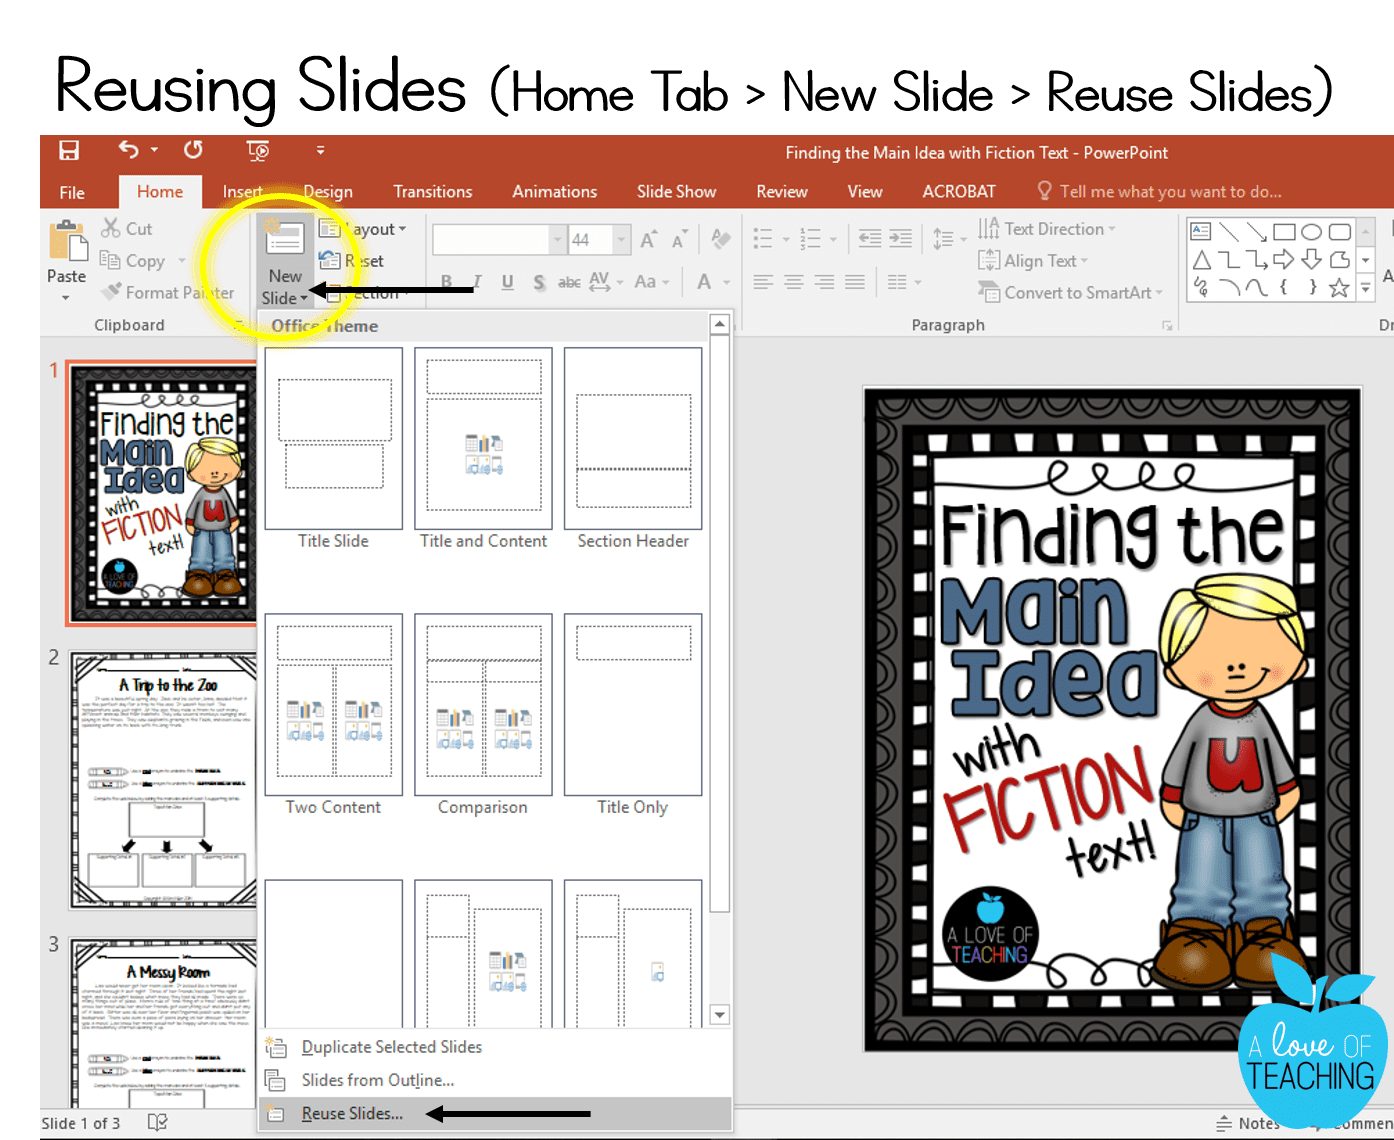
The Reuse Slides feature will open on the right side. From here, you can browse to find the file you are looking for.
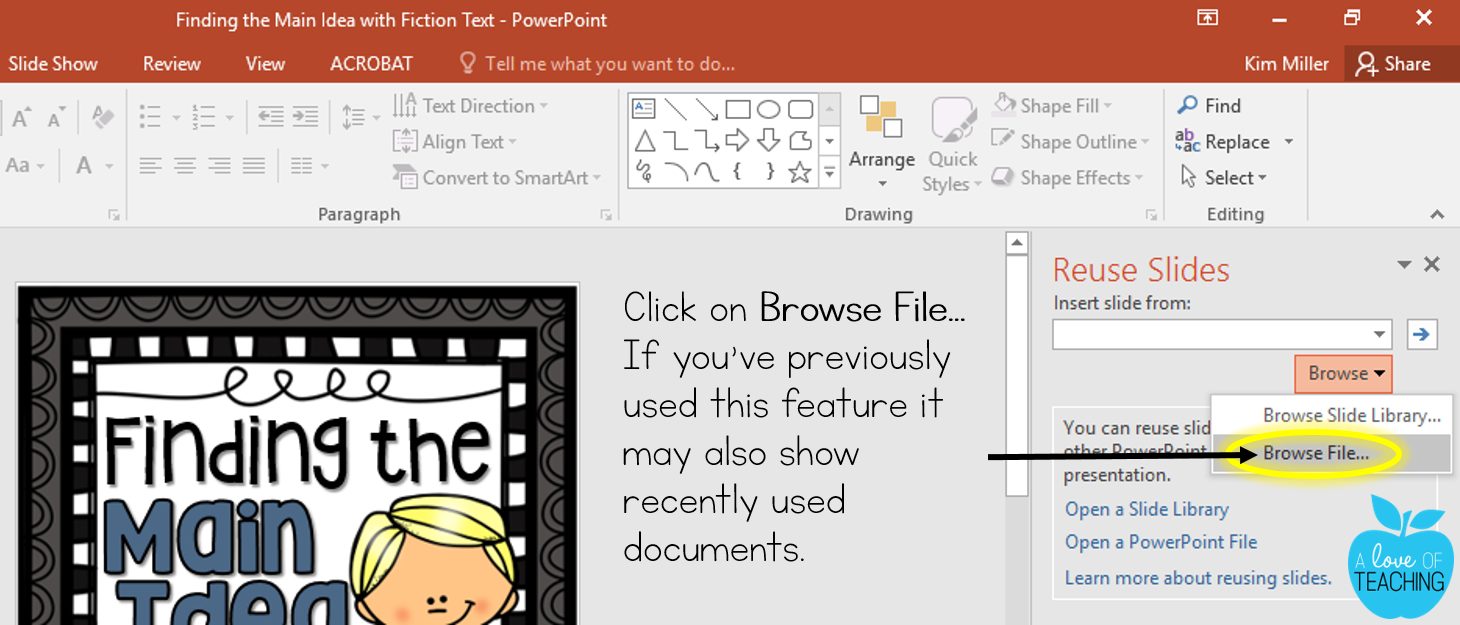
My thank you/terms of use page has a lot of parts and formatting added to it. I could always “select all” on the page and copy/paste it onto a slide in my Main Idea product, but it’s SO much easier to reuse this slide.
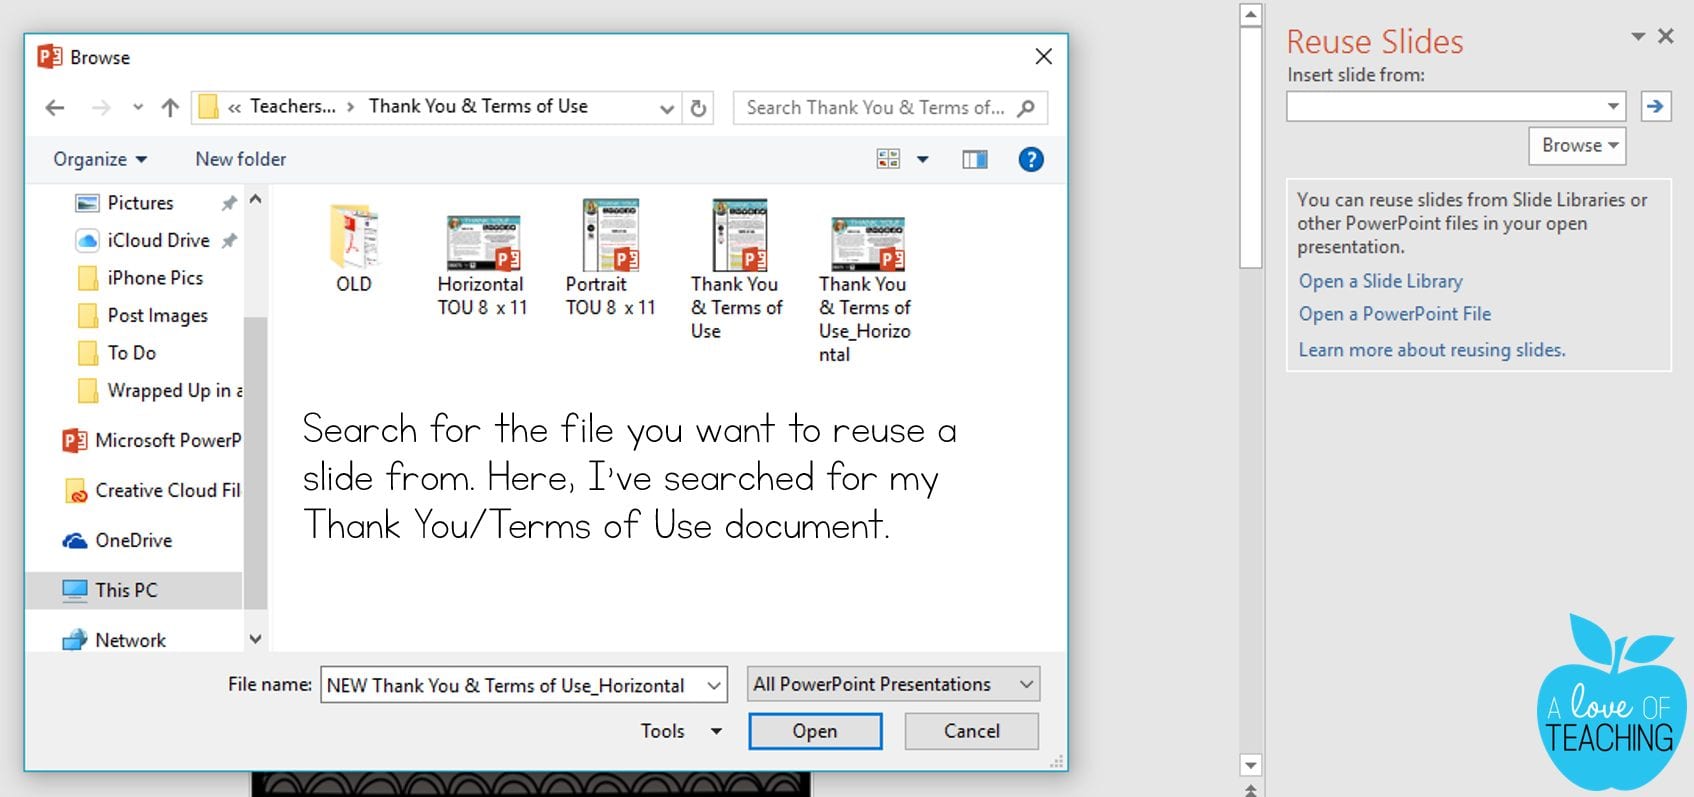
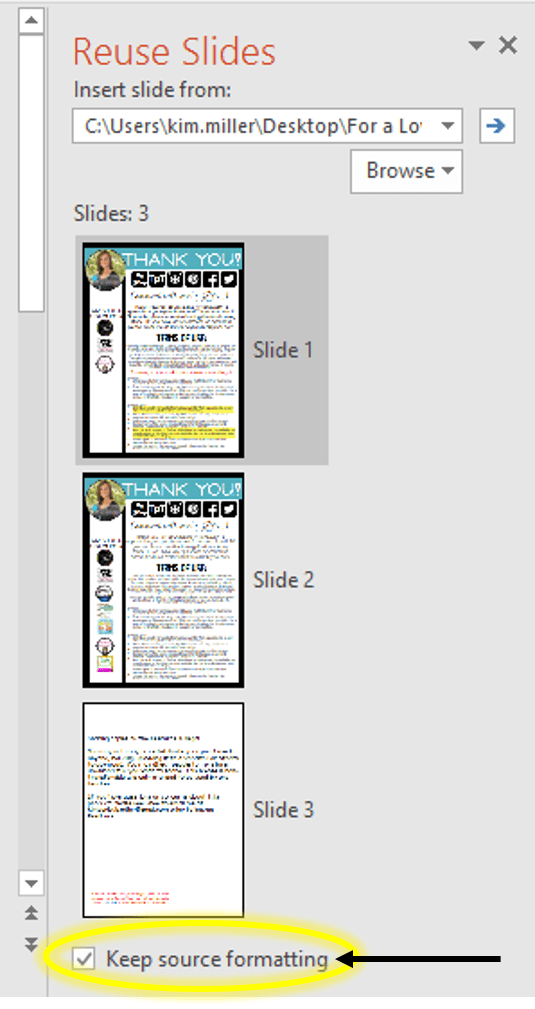
After you select the document you want to use, all of the slides in the document will open. Before you select a slide to reuse make sure the “Keep source formatting” box is checked. This will ensure that all formatting will be copied over when you insert this slide. Choose the slide you want and click on it.
In this example, I’m choosing my Thank You/Terms of Use page. I checked the box beside “Keep source formatting” and click on Slide 1.
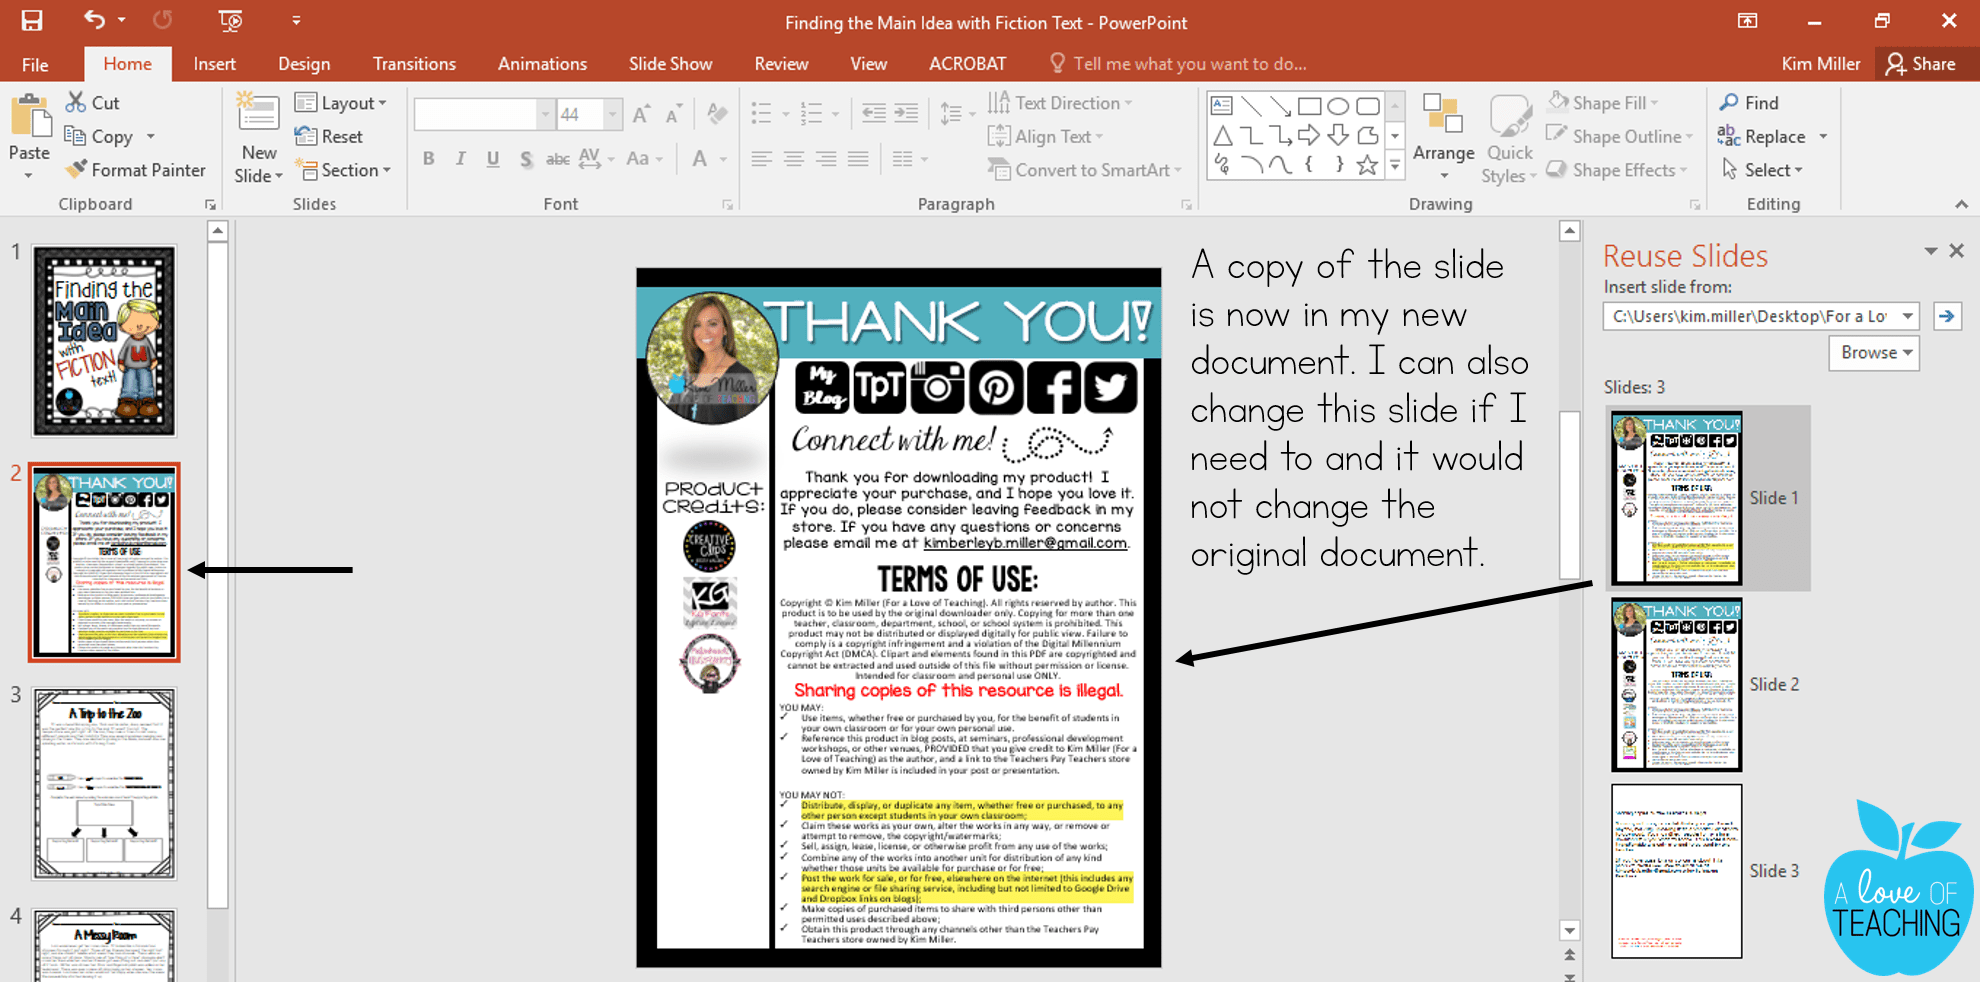
This inserts the slide as a new page and an exact copy is now in my new document. I could change anything on the slide if I needed to and it would not change the original document. So easy!
Duplicating Slides
Duplicating slides is another feature similar to Reusing slides, however, this feature is will allow you to duplicate and reuse slides within the same document. I often spend a lot of time formatting a page with background, clip art, and text. To save time, I’ll duplicate the slide so that I don’t have to reformat it again. I always do this when I’m making task cards.
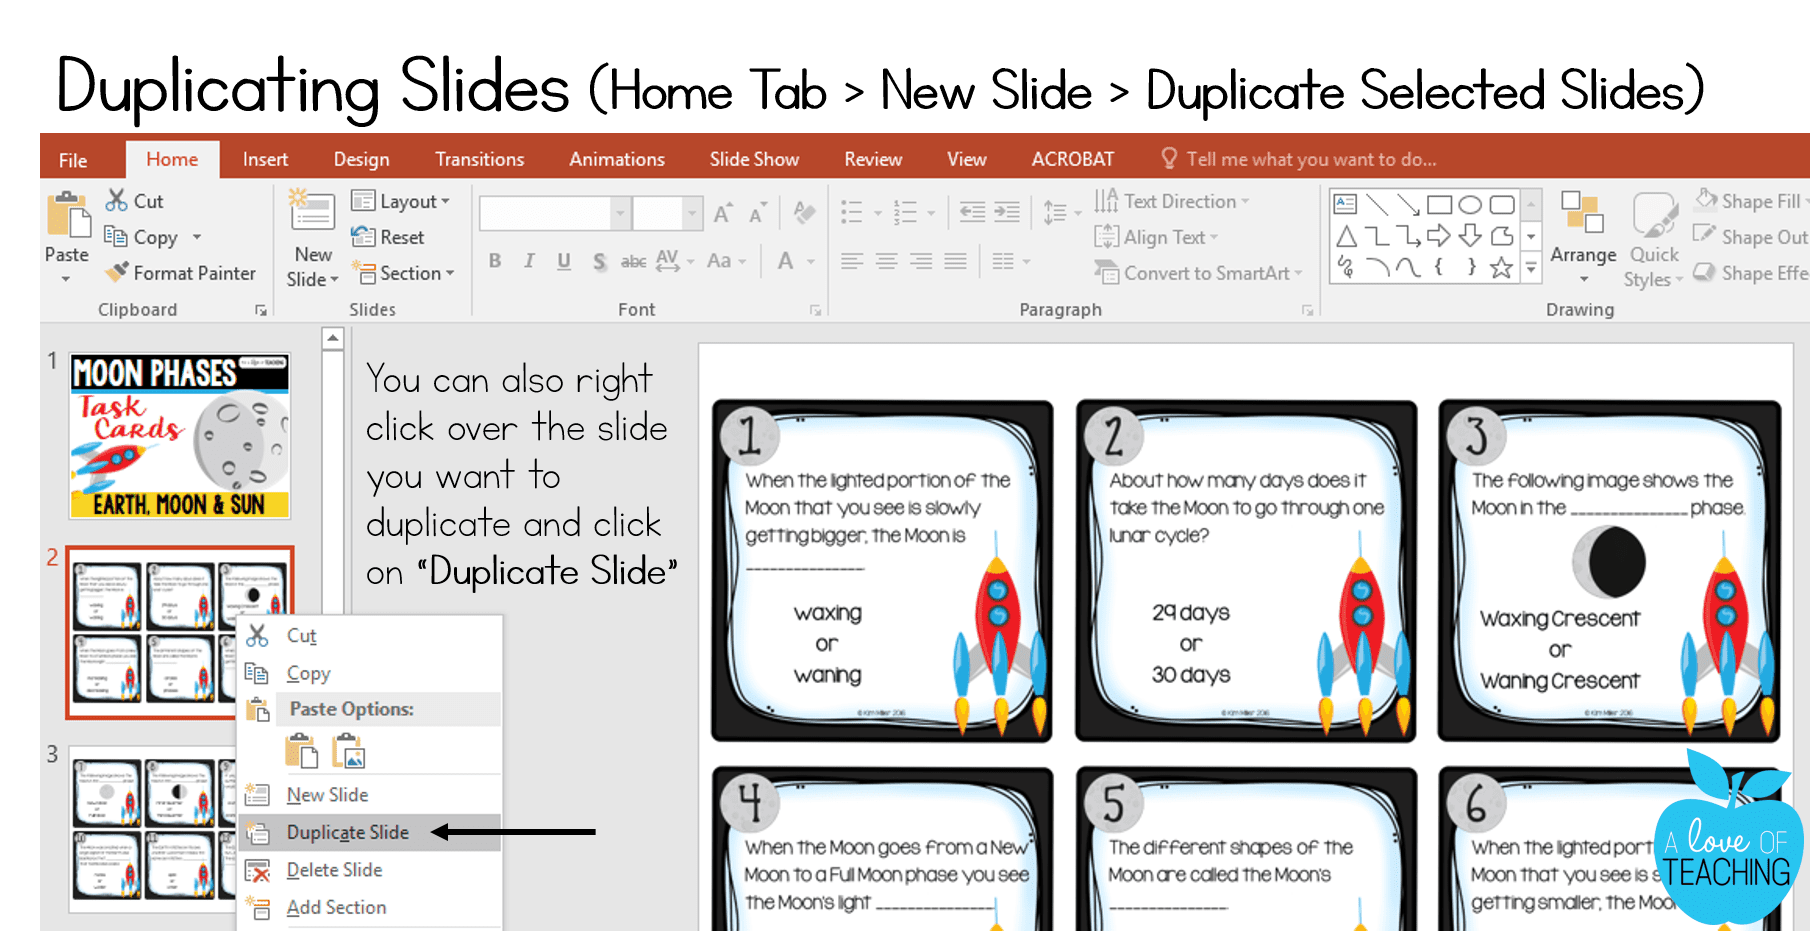
When I’m creating task cards, I want to make sure the pages are exactly the same. To get an exact copy I right-click on the slide shown in the slide preview on the left. You can also click on the Home Tab > New Slide > Duplicate Selected Slide. I just find it quicker and easier to right-click on the slide I want to duplicate.
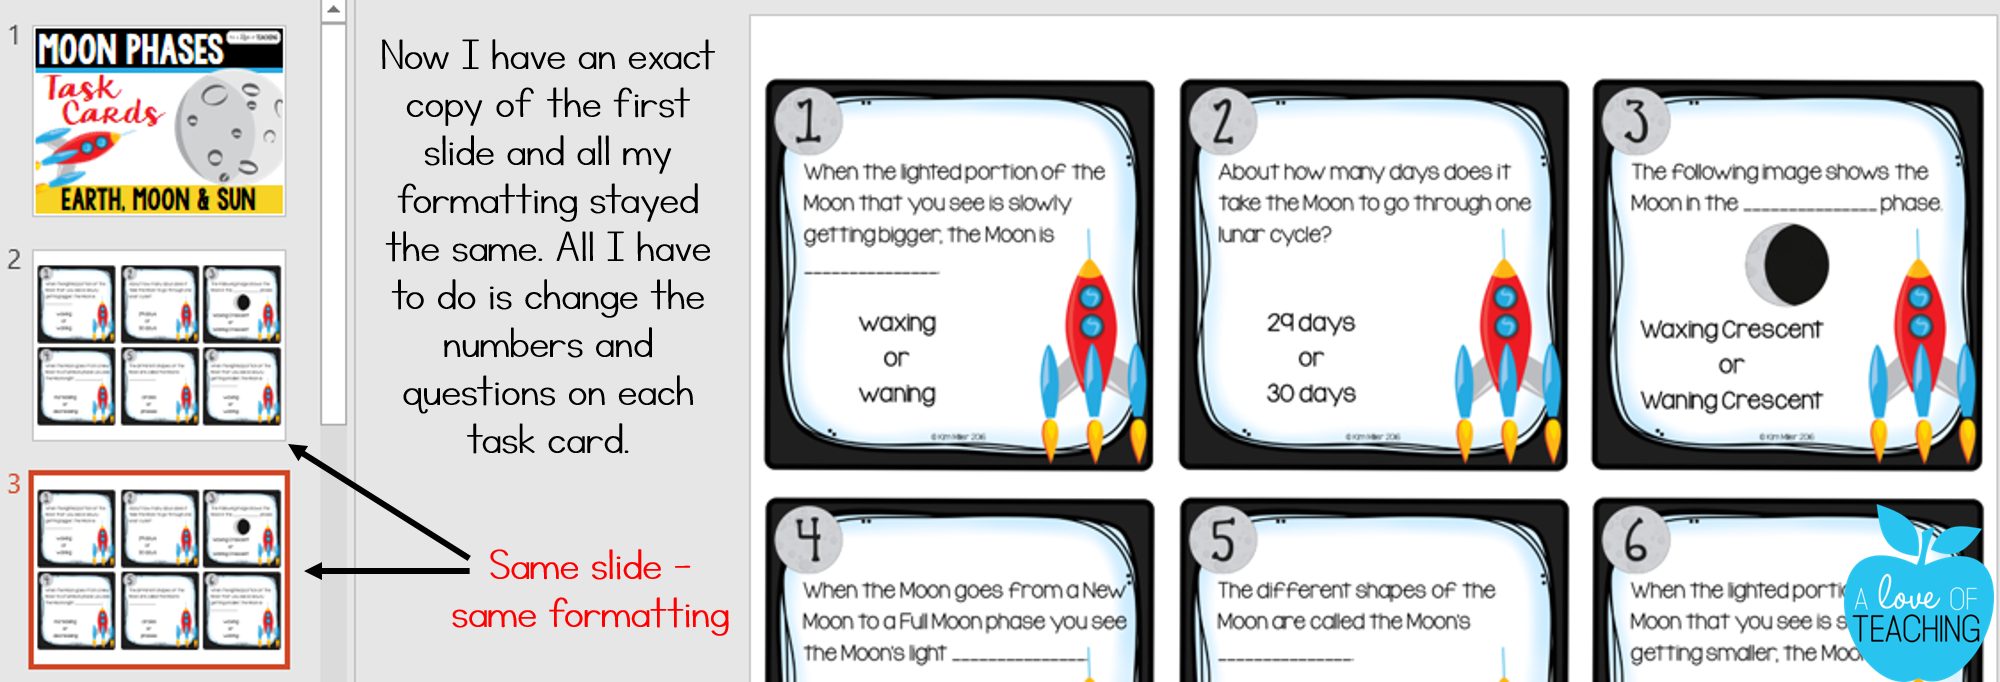
Now, I have an exact copy of the first slide, and I don’t have to recreate the page by adding all the images and text boxes again.
Saving PowerPoint Slides as Images
In PowerPoint, you can save each slide as an image. In Part 1 of this series, I showed you how to change the export resolution of your slides when you save them as an image. If you missed that time-saving secret you can find it here.
Saving a slide as an image is super easy! There may be times when you want to save only one slide as an image or you may want to save multiple slides as images.
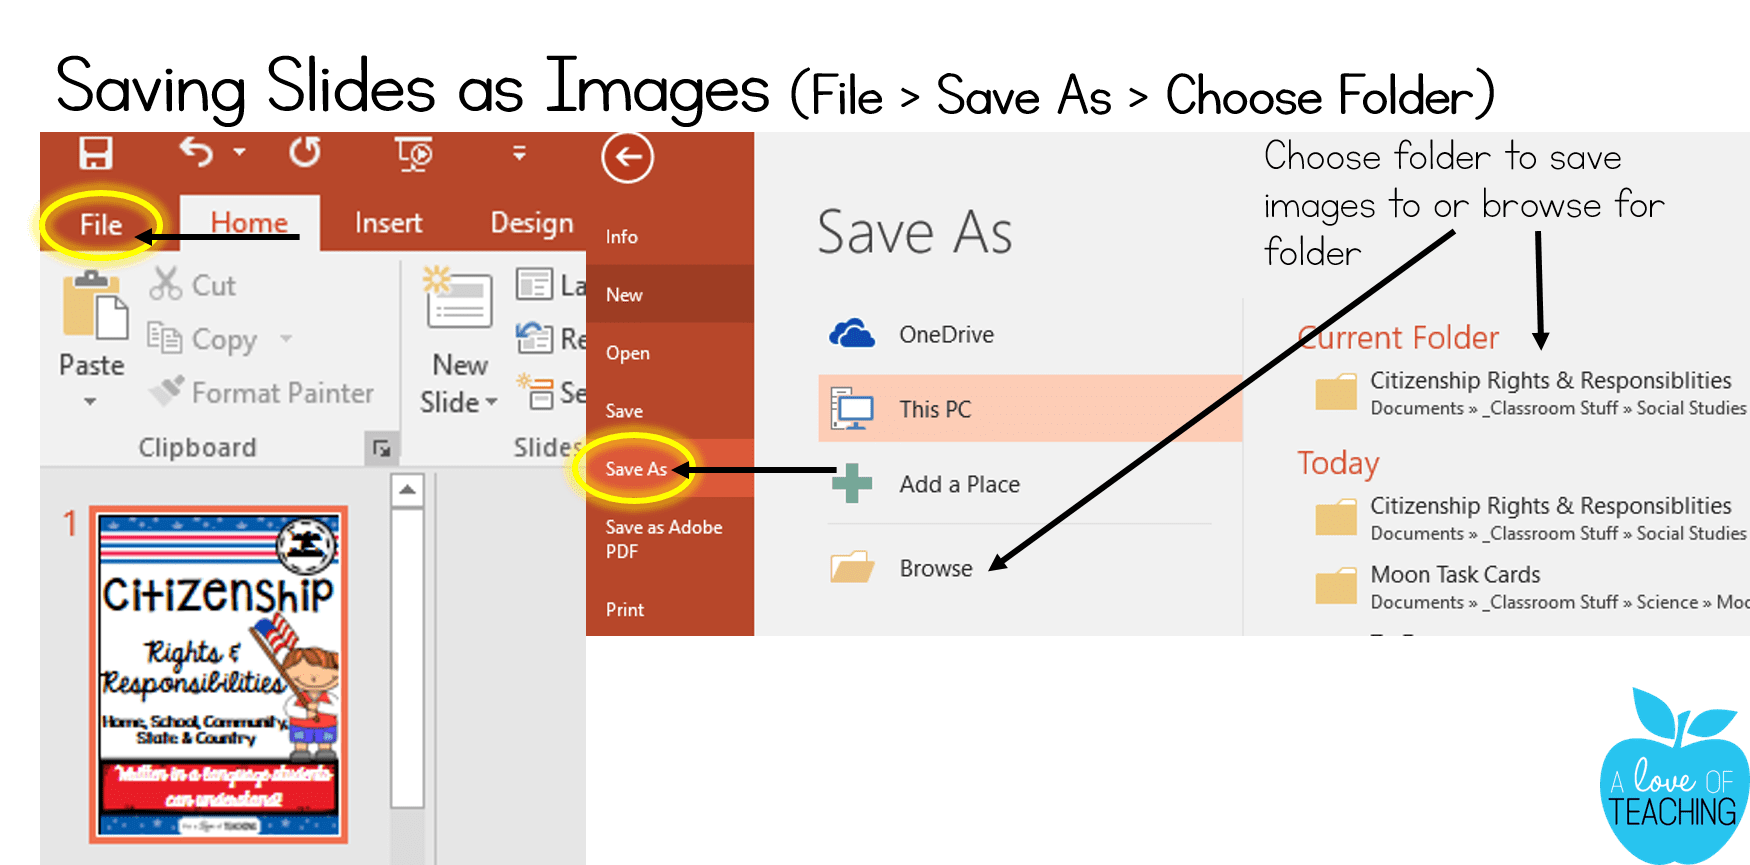
To begin saving a slide as an image click on File > Save As > Choose Folder (You may need to browse for the folder you want to save to if it isn’t listed in the most recent folders on the right.)
From here, you will need to click on the arrow beside “Save as type”. You want to change the format to either JPEG or PNG. I recommend saving as a PNG as this will produce a better quality image.
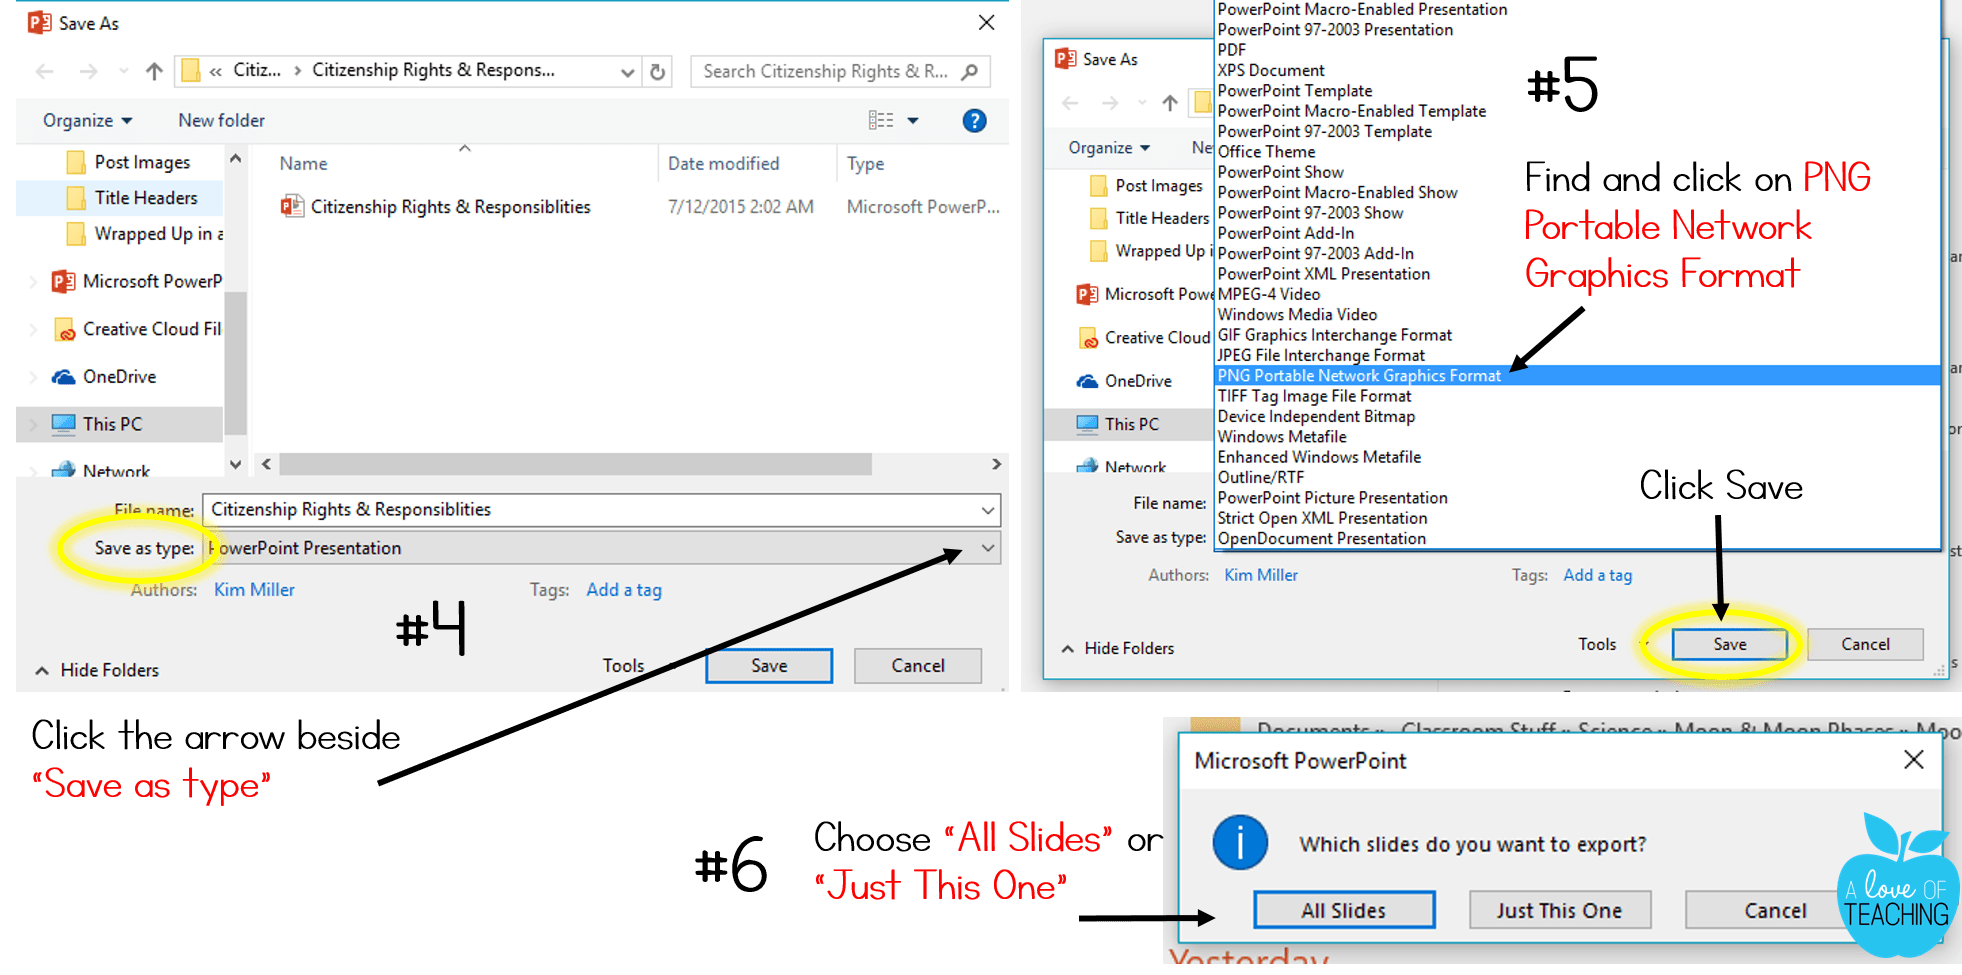
Once you click on “Save” a box will pop up asking you which slide you want to export. You can choose to export “All Slides” as images or “Just This One”.
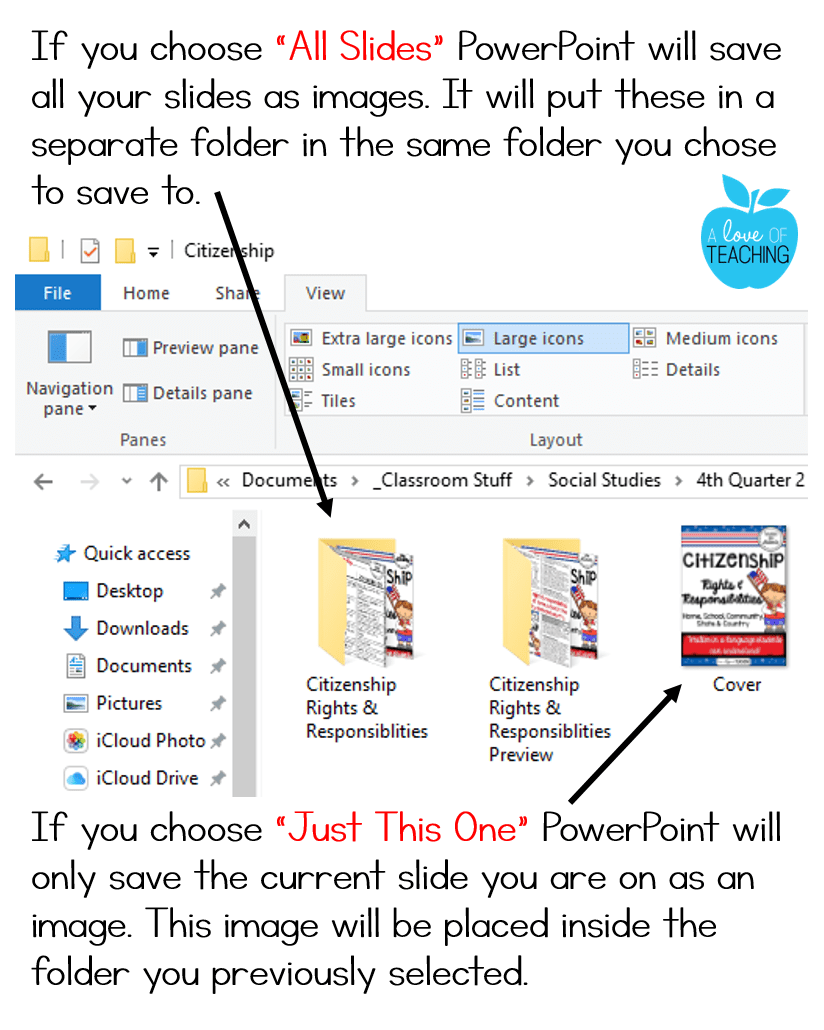
In the example above, I have chosen to save all slides as images, and PowerPoint placed them all in one folder. I also chose to save just my cover slide as an image, and PowerPoint place that image in the folder I had selected.
Changing Line Spacing in PowerPoint
Okay, time for a confession! I added this bonus time-saving secret because I completely forgot about it until I was writing Part 1 of these time-save PowerPoint secrets. As I was writing it hit me, I change my line spacing ALL.THE.TIME! Honestly, I just do it without thinking. It is so automatic for me that I didn’t even think about it being a time-saving trick until I already had these blog posts planned out. So… here’s the secret to line spacing!
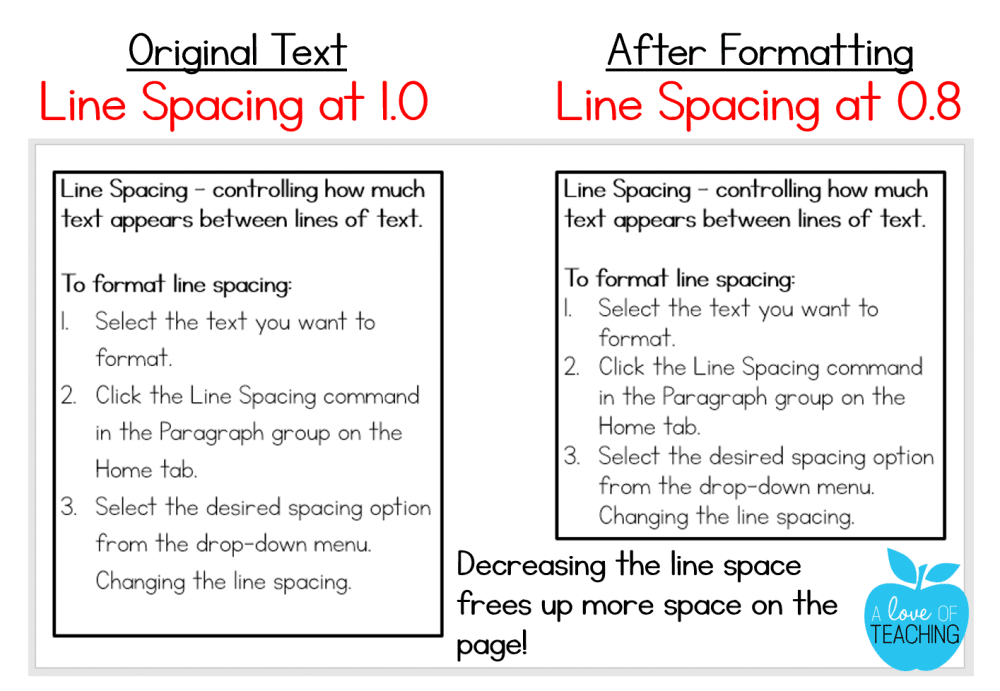
In PowerPoint, there’s an option to make your line spacing between text tighter or you can widen it out.

To format line spacing, select the text you want to change. Under the Home tab in the Paragraph section, you’ll find an icon for changing the spacing between lines. (see example above) From here, you can choose one of the options listed to widen the space between your lines, or you can choose “Line Spacing Options” to customize the spacing between your lines.
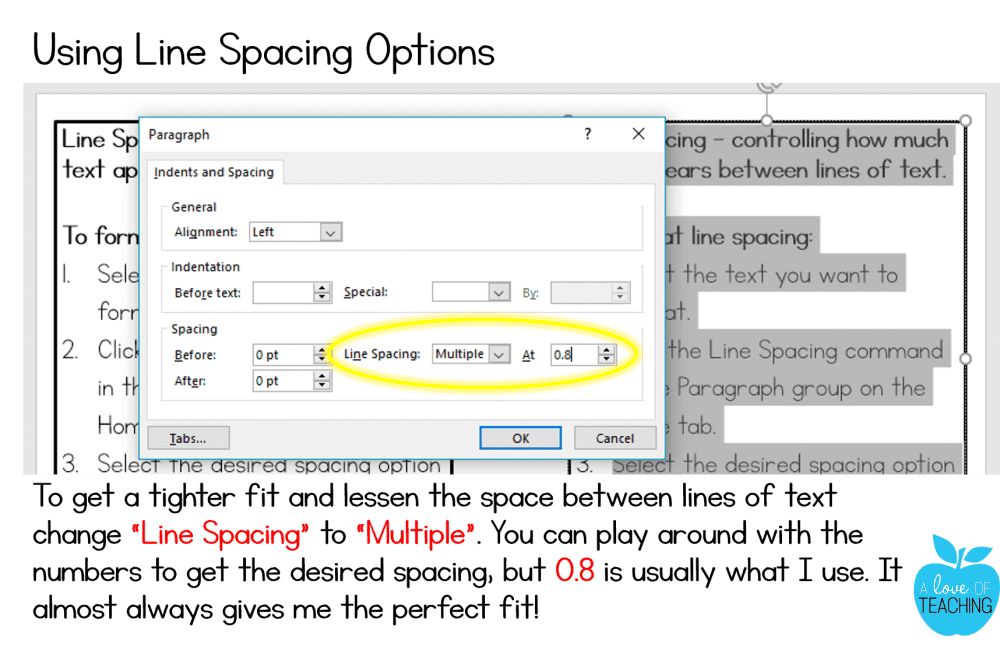
I usually use the line spacing options to decrease the space between my lines when my wording doesn’t fit within a certain space. I almost always change the line spacing to Multiple > 0.8. This usually gives me a perfect fit, but there are times that I have to tweak it just a little (depending on the font I’m using).
Pin PowerPoint Secrets so you come back later!
Hopefully, this helped you learn a few PowerPoint secrets that you didn’t already know as well as give you a few ways to save some work time. Do you have any PowerPoint tips that I didn’t list here? I’d love to know about them!
There ya go. . . 16 Time-Saving PowerPoint Secrets for Creating Printables! Whew! Did you get all of that? Don’t forget to check out Part 1 of this mini-series to learn more PowerPoint tips and tricks.


This Post Has 14 Comments
Thanks for the great PowerPoint tips! I love how easy PP is and I'm always learning new great things you can do with it!
Great blog post 🙂
You're welcome! PowerPoint is my all time favorite program to create in!:)
The councils are excellent, but not for everyone they fit. If it is a question of more business presentations, then such a format is not correct and can be assessed as your non-professionalism. The main task of the background and presentation style is to attract visual attention. Everything else is in the hands of the speaker, he must keep the audience. Who needs more interesting templates for presentations, I advise you to look for them, I use these Space Presentation Template. They are high-quality and suitable for any topic, and most importantly unique.
Thank you.
Hi Stephen,
This is a teaching blog, and these tips are not intended for business presentations. These are for teachers creating printables in their classrooms for their students. As a teacher-author for Teachers Pay Teachers, I find that PPT is the easiest way to create printables. In my business, I don't use PPT to create presentations. Thanks you for your comments, but I feel that you need to re-read the first four paragraphs in Part 1 of this series here: https://aloveofteaching.com/2016/10/16-time-saving-powerpoint-secrets-for_30.html
You're welcome!
WOW!! Thank you for sharing this!! Not too many teachers have been willing to share this type of information!
Very true! You’re welcome!
This blog post was very well done! I wish I had found a similar post when I was starting out creating resources with PowerPoint! Excellent job!
Thanks so much! Glad you found these tips helpful!
I appreciate all of the insightful information that you have provided. I’m just starting on this journey and your tips have been incredibly helpful.
You’re so welcome, Amy! Best of luck to you!
Hi Kim! I am opening my own TPT store and found all of these tips SO HELPFUL! Thank you so, so much for sharing! Other than scouring Pinterest and YouTube for blogs and videos with design tips, could you point me to any other resources? I’m not very experienced with design I have two little boys and really want to be efficient with my time. I can’t decide if I should take a design class, or just plan to learn as I go. Thank you again for sharing your tips here! I sure do appreciate it. 🙂
Jillian
Hi Jillian! Congratulations! How exciting!! I highly recommend the course TpT Focused Success by Shelly Rees. Check it out at the link below!
https://the-focused-teacherpreneur.thinkific.com/courses/the-focused-teacherpreneur