
Do you use PowerPoint? This software is well known for creating professional slideshows. It has all the tools needed to create multimedia presentations as well as personal photo slideshows, but did you know it can be one of the most useful programs for creating printables for the classroom?
When I first started creating curriculum resources on Teachers Pay Teachers I used Microsoft Publisher. I didn’t even bother attempting to create anything in Word. If you’ve ever tried to manipulate images or layer images in Word you know how frustrating it can be. Publisher seemed to allow for more flexibility when it came to inserting borders, clipart, and text boxes.
I used Publisher for two years before trying PowerPoint, and I can honestly say that PowerPoint has Publisher beat when it comes to creating and designing digital content. Since switching to PowerPoint, I haven’t even opened Publisher once and don’t plan to. If only I had known this when I first started selling resources on Teachers Pay Teachers!
Over the years, I have learned a few tips and tricks to creating printables in PowerPoint. Some of these I figured out on my own, some I learned from other TpT sellers, and some I found by searching for a solution to the problem I had at the time. Below, I’ve listed 8 of my best time-saving PowerPoint secrets. This is only Part 1 – yes I have more! I have 8 more (plus a bonus tip) in Part 2 of this mini-series.
Are you are new to Powerpoint? Maybe you’ve been using it for years? Maybe you’re here because you also create products for Teachers Pay Teachers. Or, maybe you simply want to make printables for your own classroom? Either way – these tips are for you!
Note: I’m using a PC with Windows 10 and Microsoft Powerpoint Office Pro 2016. Your version may vary slightly.
Creating PowerPoint Templates
When you open PowerPoint and choose a blank slide the makers of the software automatically assume you are wanting to create a presentation. You will see text boxes for a title and subtitle already placed for you, and the default page size is set for a widescreen presentation. I found myself constantly having to delete those text boxes and change the slide size to a standard piece of paper. This was driving me crazy, but I found a fix for this!
Create templates for the sizes you use the most. For me, it was 8.5 x 11 (horizontal & vertical), 8 x 8 square, 3 x 5 and 4 x 6 (task cards).
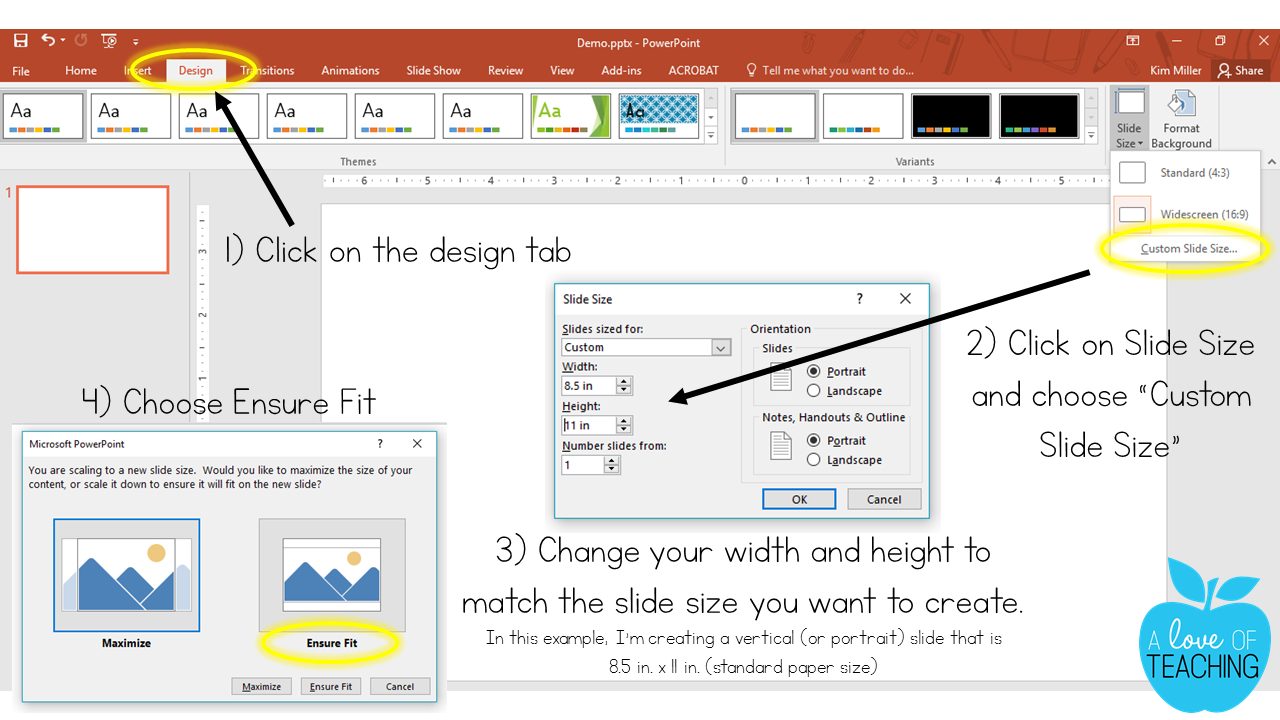
- Open PowerPoint and delete the text boxes on the slide.
- Click on the “Design” tab at the top
- Choose Slide Size all the way to the right and click on “Custom Slide Size”
- Change your width and height (PPT measures in inches) and click OK
- Choose “Ensure Fit” to make sure everything fits and stays in the printed area of the page
Leave this slide blank and go to File > Save As. Switch the file type to PowerPoint Template. (see below) PowerPoint will automatically save this to your documents in a folder called Custom Office Templates.

Complete these same steps to create templates for the sizes you use most frequently. No more deleting text boxes and customizing the slide size every time you open up PowerPoint!
Pin for later!
Unsnap Objects to Grid (Easily Moving Objects in PowerPoint)
When you move, resize, or draw a shape in PowerPoint it will align or “snap” to the nearest intersection of the grid even if the grid is not visible. It may also snap to other objects or shapes close by. This becomes a problem when you are trying to place or layer objects and you want them to stay where you put them. By default, PowerPoint is set to “snap object to grid”, but you can control the alignment and snap-to capabilities by turning it off.
- Click on the “View” tab at the top
- Under Ruler, Gridlines, and Guides click the small arrow in the bottom right corner
- Uncheck the box beside “Snap objects to grid”
- Click on “Set as Default”
 Now, you can move objects anywhere on the screen and they stay where you put them. You can also use your arrow keys to slightly nudge objects if needed.
Build with Grids and Rulers
You can choose to view the ruler, gridlines, or just a 4-square grid while creating printables in PowerPoint. I use the ruler a lot while building pages, but I find the gridlines and grid to be a nuisance to use all the time. However, there are times when the gridlines and grid options are useful. Sometimes I just need to get an object lined up perfectly, such as text boxes or clipart. So, I choose to view the gridlines. I often use the 4-square grid when creating task cards on an 8.5 x 11 template. By using the grid, I can make sure that my sizing and alignment are exact.

Changing the Export Resolution
There may be times when you want to save a slide as an image. As a Teachers Pay Teachers seller, I have to do this for every product I create. I need the slides as images when I create previews for buyers. When I first started using PowerPoint I noticed that my images (slides) were a little blurry, and I didn’t like that. I knew there had to be a fix for this, so I went on a little Google search to find the solution to this problem.

By default, the export resolution of a PowerPoint slide that you save as a picture is 96 dpi (dots per inch), which is not a good image resolution. However, you can easily configure the resolution of your slides when they are exported as an image.
Note: This will require you to use the system registry to change the default resolution setting for exported slides. I promise it’s super easy! Just follow each step in order. *I changed my export resolution to 300 dpi which yields a crisp, clear image when exported.
Microsoft Support also has a great tutorial for this.
As a tip, I suggest that you select PNG format when saving your slides as images. You can expect better quality images when you save as PNG images rather than JPEG or some of the other types listed.
Using the Eyedropper Tool
Note: The eyedropper tool is not available in versions of Microsoft Office prior to 2013. If you have not updated, this one tool could be the very reason that you should. It is well worth it!
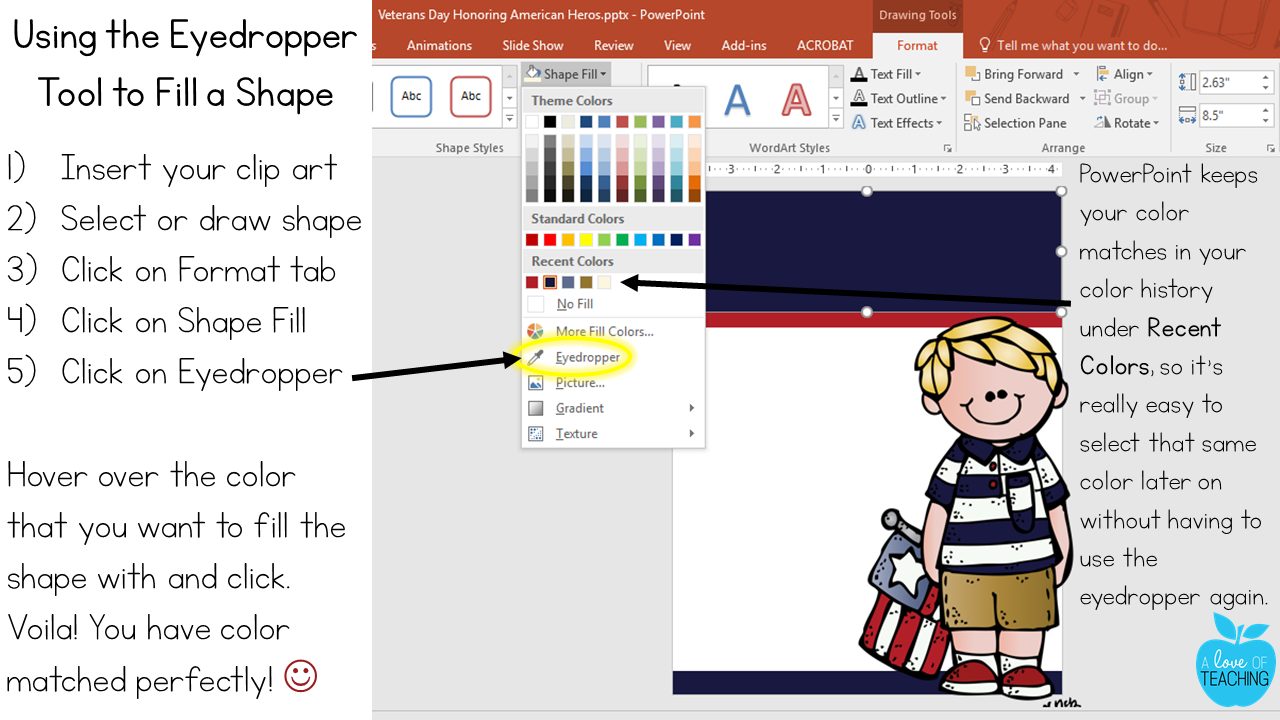
Have you ever tried to match the color of shapes or texts to the colors found in clip art, digital background paper, or pictures you are using in your document? If so, you know how hard this can be to get perfect! Microsoft Office 2013 introduced the eyedropper tool and for me was a life-changing, time-saving, best thing since sliced bread – formatting tool! The eyedropper takes the guesswork out of color matching and matches it perfectly for you.
In the example below, I wanted the rectangle at the top to match the blue color in my clip art (boy’s shirt). By selecting the shape > Format Tab > Shape Fill > Eyedropper I could hover over the blue in the boy’s shirt and fill the shape with the same shade of blue.
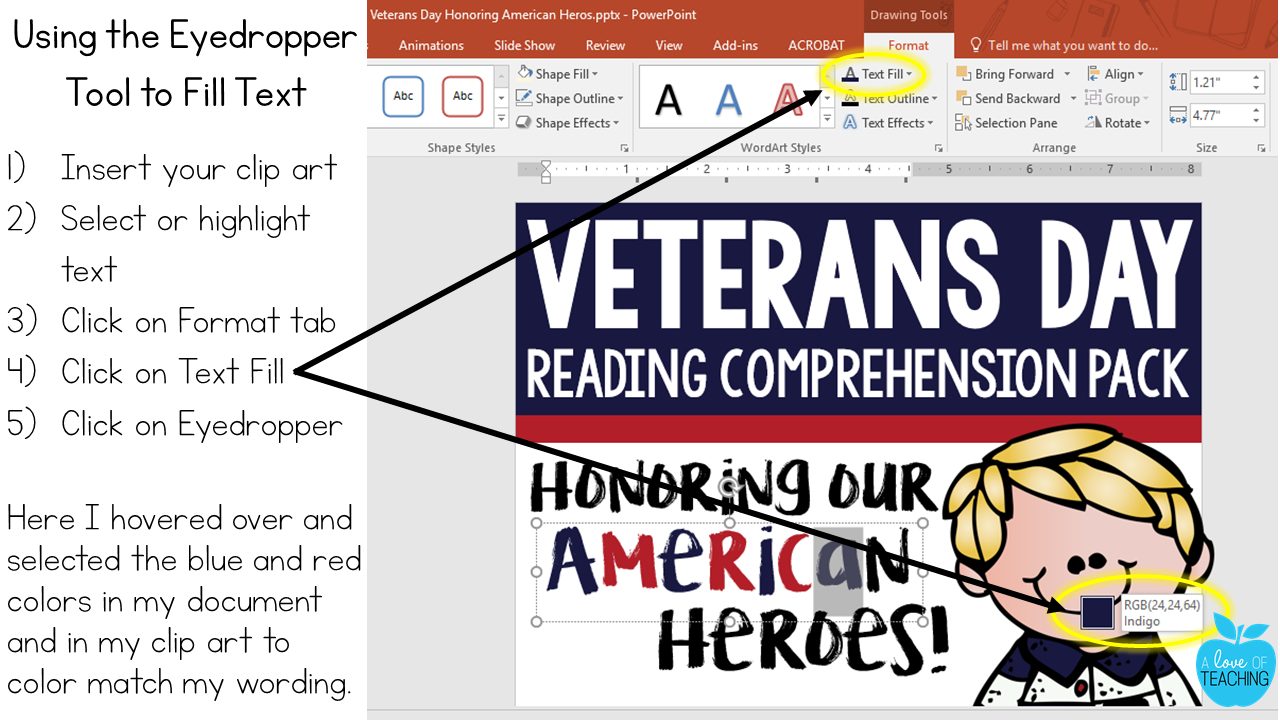
You can also color match fonts by highlighting (selecting) the wording (or in the example below – individual letters) > Format Tab > Text Fill > Eyedropper.
Character Spacing: Font Kerning
I learned about this amazing trick by chance when I just happened to stumble upon it one day while trying to format some text, and I instantly shouted “Hallelujah!!!” What a surprise to find out that kerning was a formatting feature available in PowerPoint. I don’t use it very often, but there have been times that I was happy this was an option.
Space is valuable when it comes to creating printables, and using your space wisely is important! To create eye-pleasing documents and presentations you have to consider how you are using your space. Is your wording too big? Not big enough? Do you have times that you just can’t find the perfect font to fill the space you are working with? This is where “font kerning” comes into play.
In the example below, I had a lot of unused space on the top right side of the page. I tried to find a font for the words “Unit Resources” that would fit between the other wording on the page but also be long enough to fill the blank space. Since I just couldn’t find a font that would work, I used font kerning to expanding the space between the letters. Then I played around with the numbers to find the perfect amount of spacing between characters and was able to use the font I had originally chosen to fill the empty space.
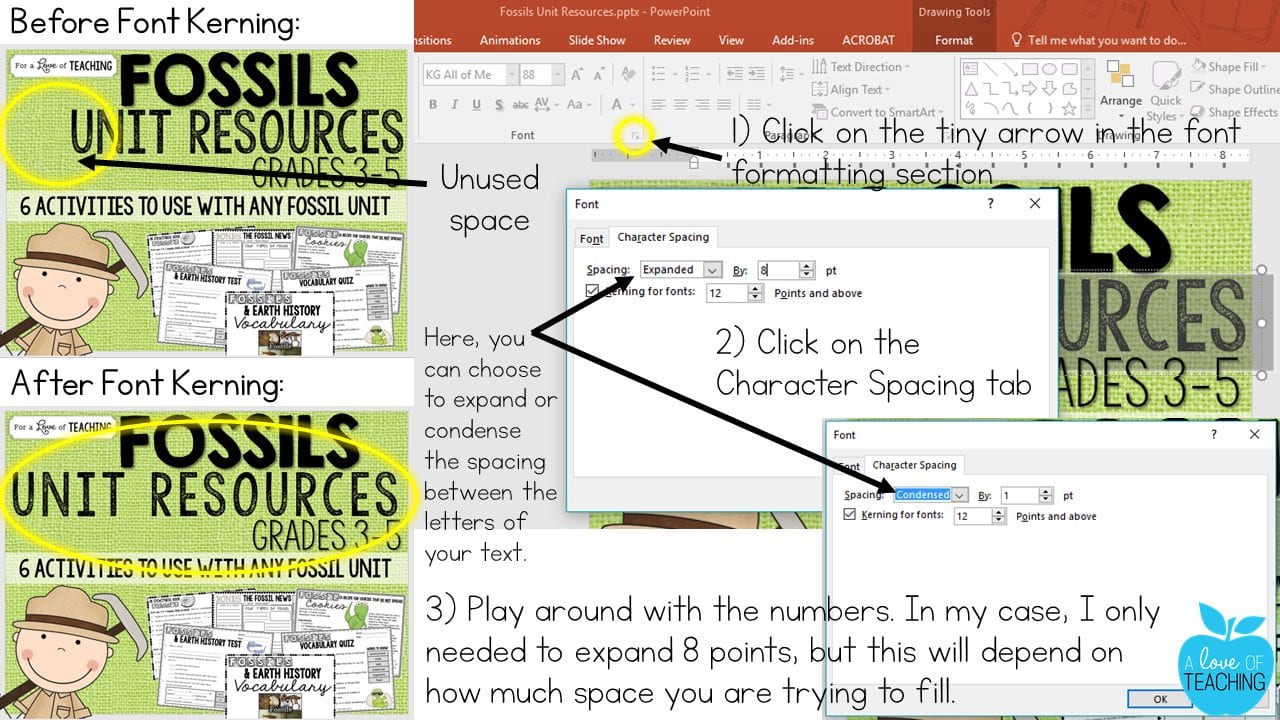
As I said, font kerning is not a tool that I use frequently, but it does come in handy at times. It also saves a lot of time when you are trying to find the perfect font to “fit” and “fill” a certain space on the page.
Using the Format Painter Tool
There is a tiny paintbrush in the upper left-hand corner of the home tab in PowerPoint. You may or may not have noticed this before, but this little tool can save you a ton of time when it comes to formatting text on the page. It’s called the Format Painter.
In the example below, I wanted the words “What are minerals used for?” formatted in the exact same way (same font, size, spacing, etc.) as the wording “Show what you know!”. So, I used the Format Painter tool.
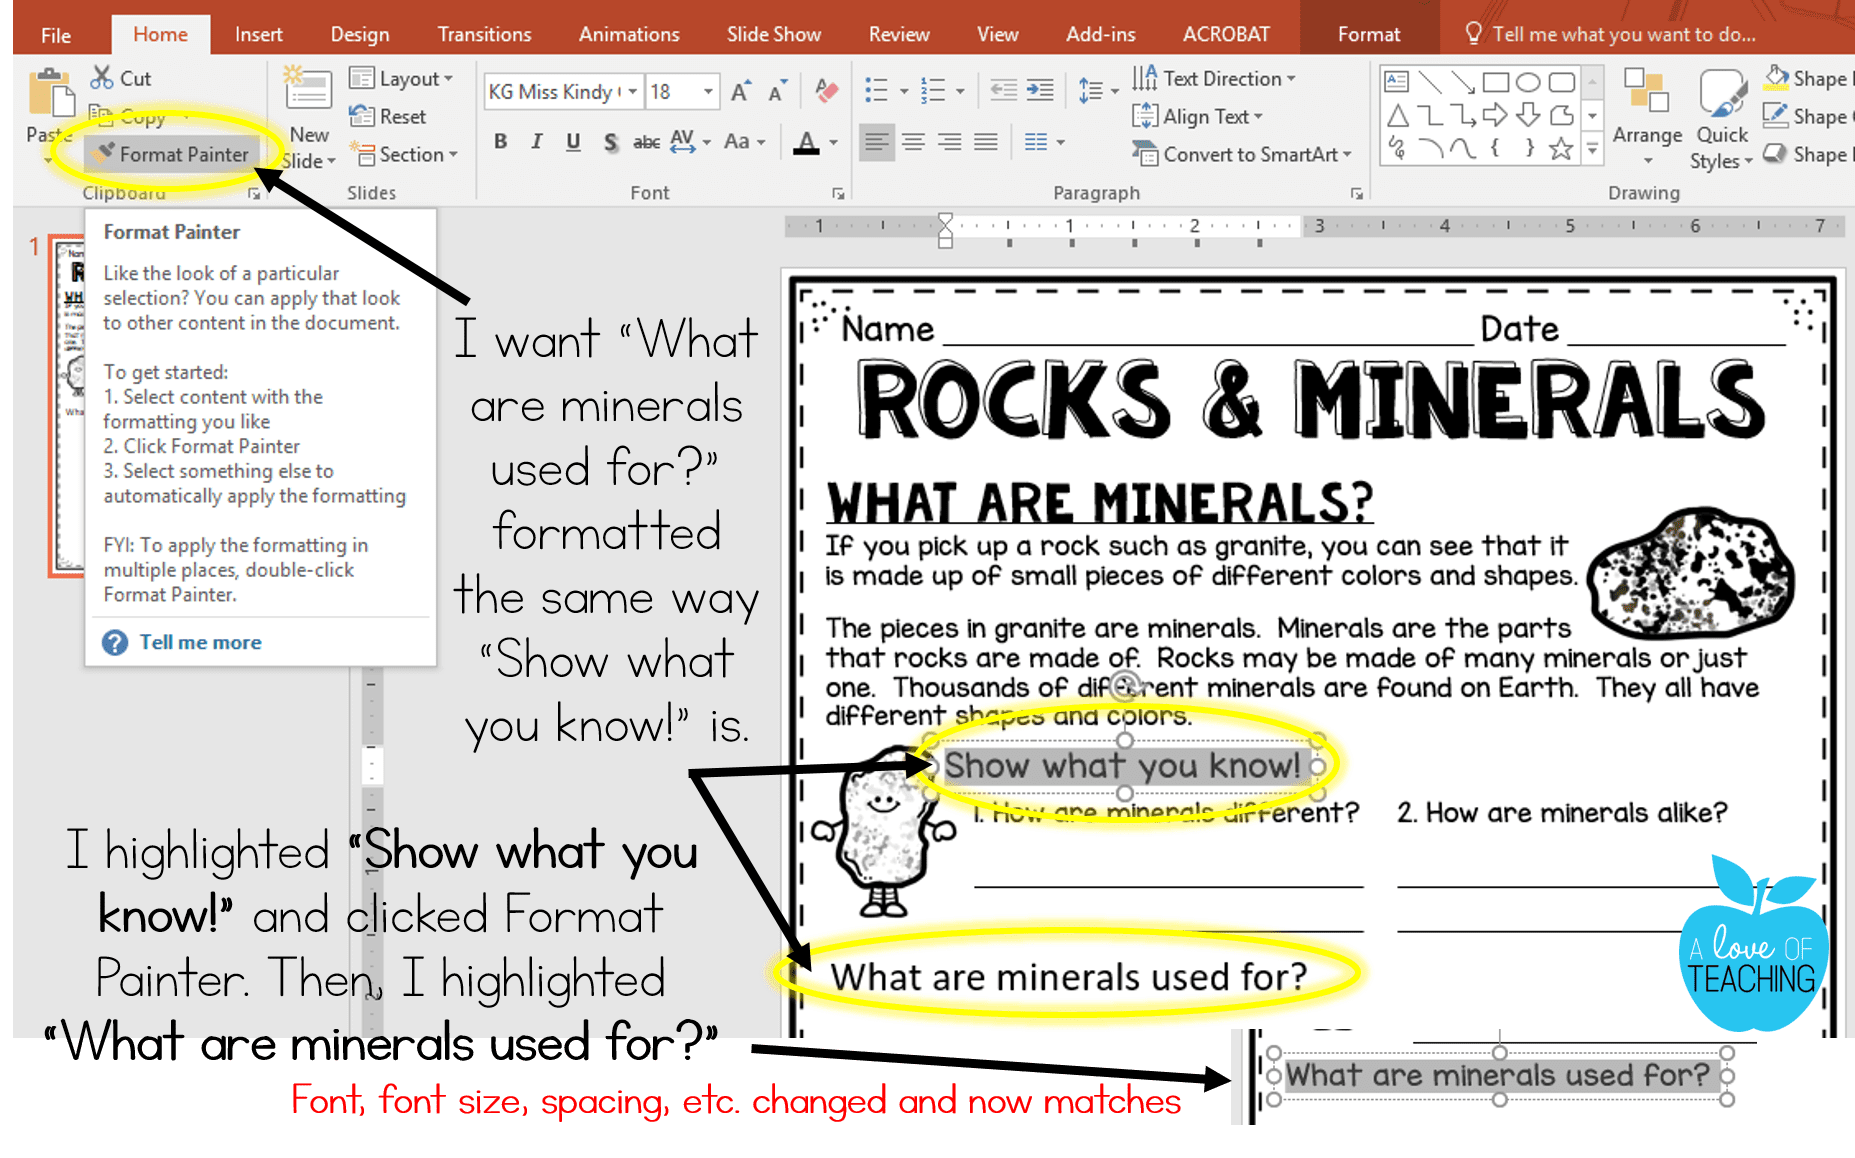
This trick is sooooo easy! I simply highlighted the words “Show what you know!” and then I clicked on Format Painter. (Your cursor will turn into a paintbrush icon.) With the cursor as a paintbrush, I highlighted over the words “What are minerals used for?” The Format Painter changed the text to be formatted in the same way as “Show what you know!”
Note: to apply the formatting in more than one place, double-click the Format Painter.
I know that’s wordy, but hopefully, you get the gist of it. This is really much easier than trying to find the same font, same size, same color, etc of a certain text that you’ve previously formatted.
Finding and Replacing Fonts
This time-saving secret is for replacing fonts within your text. Sometimes you have wording on a page or multiple pages and you just don’t like the font. You may also have several different fonts throughout your slides, and it would be very time consuming to go through each slide, highlight the text, and change it to a different font. This is when Find and Replace Fonts comes in handy!
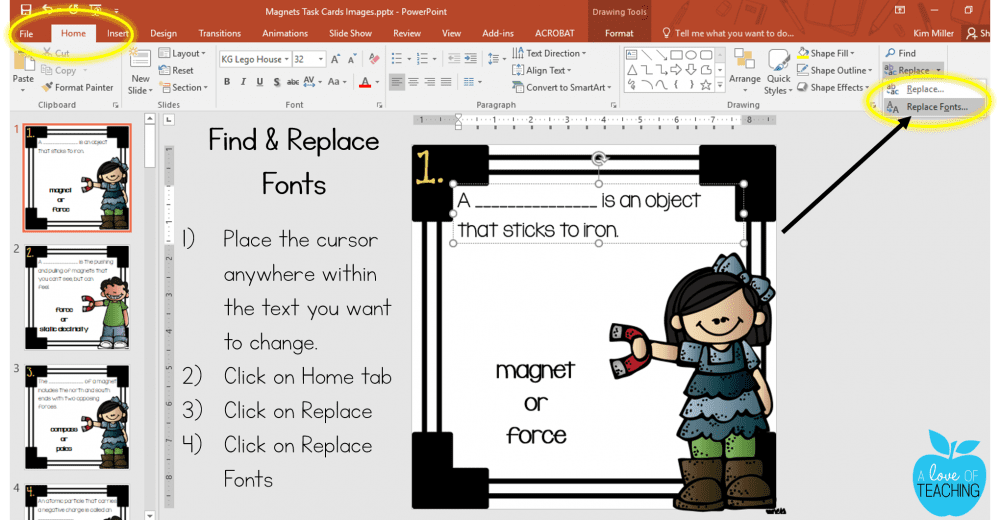
To find this tool, click on the Home tab. It will be in the far right corner of your screen. I’m using some task cards I created for an example. I think the font looks fine the way it is, but let’s say I didn’t like it and wanted to change it.
In the picture above, I placed the cursor inside the text I wanted to change. I clicked on Replace > Replace Fonts.
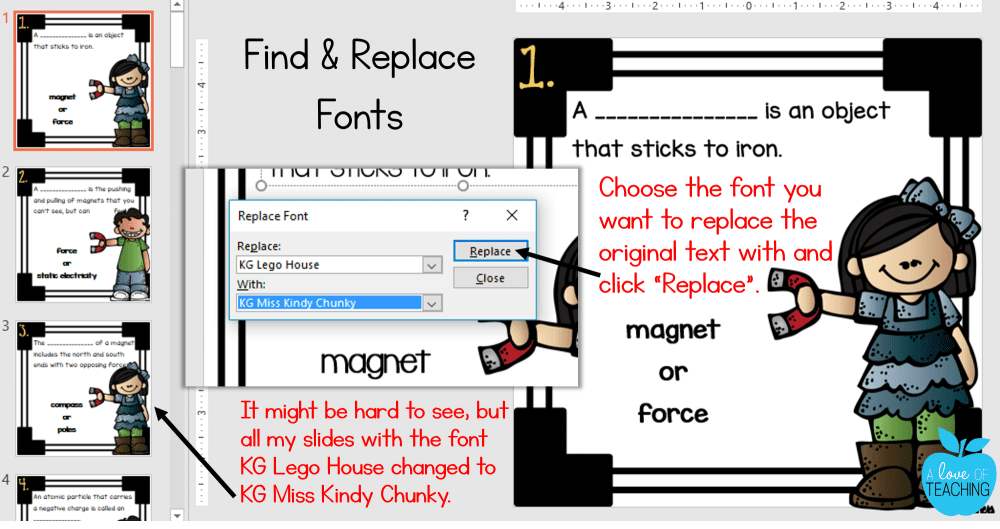
A box will pop up allowing you to choose a different font. In the example above, I chose to replace KG Lego House with KG Miss Kindy Chunky. I clicked on Replace, and it automatically changed all the text that was originally KG Lego House to KG Miss Kindy Chunky. It’s kind of hard to see, but it changed the text on every single slide – not just the slide I was on. How’s that for saving some time?!?
Did you get all that? 🙂 I hope these 8 time-saving secrets for creating printables using PowerPoint are helpful. I broke this post into two parts, so make sure you catch Part 2 for eight more tips (plus a bonus secret).
Click HERE for Part 2
Pin for later!
Did you know about these time-saving secrets? I use PowerPoint on a daily basis and sometimes I forget what others may or may not know about this program. I’d love to know your thoughts on these time-saving tips. Are there any you already use? Or, are there any tips you plan to use soon? Leave me a comment and let me know!


This Post Has 21 Comments
Thank you.
amazing! so helpful! thanks!!!!!
You're welcome!
You're welcome! Glad they were helpful!
Hi Kim,
Loved this post..so much useful information! One question–are your TPT thumbnails in 300 dpi? I tired uploading some at that resolution and I got the message that the file is too large!
Thanks,
Nancy
Quick question. I have a doubt about which version I have to use for creating in Powerpoint. Does it have to be the Pro version?
I don’t think so. From what I can tell, you just need PPT version 2016 or higher to easily use most of these tips.
You can replace fonts?? Whaaaat. That is a game changer! I have tediously replaced fonts in older products and just did it page by page. Thanks for these time saving tips!! 🙂
Haha! I know! It’s such a great feature of PPT!
I agree!! This will save a lot of time!! Thanks for sharing!!
You’re so welcome! 🙂
Wow! These were so helpful! Thank you!
You’re welcome! 🙂
Excellent tips! Wish I had found a blog post like this when I first started using PowerPoint to resources! Thank you…
Thank you!! 🙂
These tips are why your products look amazing! Thanks for sharing
Awe…thank you, Julie! 🙂
Thank you so much! I was trying to figure out how to get my saved jpeg and png powerpoint pictures not blurry, so this is exactly what I needed.
So glad you could use these tips!
I have been trying to figure out how teachers create such awesome printables. This is a wonderful resource… I can’t wait to try. Thanks so much:)
You’re welcome, Jackie! I’m glad this post was helpful! 🙂